Tuesday, April 5, 2011

Frame Illusion Hydrangea

Good Morning everyone!

One of my favorite Hostess sets in the current Idea Book is Because I Care. It features this stunning hydrangea flower stamp. I haven't played with it for quite awhile so I thought I would break it out and make a few things with it. Here is one of the cards that I made with it...


This card is made using the Frame Illusion technique that I learned how to do from a super talented lady named Michelle Zindorf. She is an amazing artist and creates very easy to follow tutorials on her blog. She posted a tutorial quite awhile ago on this technique which you can see here.

I think I haven't played with the Because I Care stamp set very much because the flower to me seemed a little intimidating to color. The way I did mine for this card was super simple! I inked my stamp with versamark and then the flower head I inked with Elegant Eggplant. I then used my Old Olive marker to ink the leaves and stem and then stamped it in the center of my panel. I then clear embossed the flower. Then I colored my leaves and stem using my old olive marker. I used a blender pen and perfect plum ink to color the flower head. Because the blender pen fades out when it starts running out of ink it created the shading and hue changes for me. I then went over the whole thing with a versamarker and clear embossed again. That is it! I used the flourish from Elements of Style on my frame. The rest I just followed Michelle's tutorial. I did use a chocolate chip marker for my shadow because I don't have the soft suede but the rest is pretty much the same. Be sure to check back tomorrow when I show you my second card that I made with the Because I Care Stamp Set! Have a great day!

Here is what I used on my card:

Stampin Up! Stamp Sets: Because I Care Hostess Set, Elements of Style

Paper: Stampin Up! Elegant Eggplant, Very Vanilla, Whisper White

Ink: Stampin Up! Classic ink pads in Elegant Egglant, Sahara Sand, Soft Suede, Chocolate Chip, Perfect Plum, Early Espresso

Accessories: Stampin Up! Versamark, Versamarker, heat tool, clear embossing powder, post it notes, Scallop Oval punch, large oval punch, dimensionals, sponges, ruler, stampin write chocolate chip marker

Pin It

Monday, April 4, 2011

Birthday Bakery Awning Card

Good morning everyone!

I had a chance yesterday to do some stamping and decided to make some challenge cards!

I came across a website called Create with Connie & Mary and they post some challenges each week using Stampin Up! only products. I thought it would be fun to try.

This week they gave you this picture of a cake for inspiration:


Here is my card:


I have been wanting to try one of these Awning Cards for awhile and thought this was a perfect time to make one! I used the blue & white stripes from the cake as my awning colors. The gold swirls on the cake inspired my "building wall" and of course you have to have lots of yummy cakes in the "window". It is hard to see in the picture but on my white frosting areas I used iridescent ice to make them sparkle. Lots of fun! This was the first time I got to use the Birthday Bakery Hostess exclusive set. It is super cute! Get your's by hosting a workshop, or by placing an order of $150 or more because they earn hostess credits also! Contact me for more information!

Here is what I used on my card:

Stampin Up! Stamp Sets: Birthday Bakery - Hostess Exclusive Set, Elements of Style

Paper: Stampin Up! Pacific Point, Whisper White

Ink: Stampin Up! Classic ink pads in Versamark, Pacific Point, Real Red, Basic Black, Baja Breeze

Accessories: Stampin Up! Blender Pens, Word Window Punch, Gold Embossing Powder, Heat tool, Iridescent Ice, Versamarker, Chocolate Chip Stampin Write Marker, dimesnionals, 2-Way Glue Pen

Pin It

Saturday, April 2, 2011

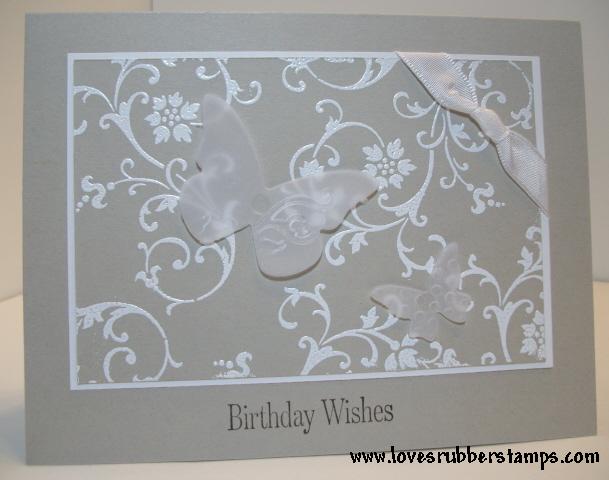
Vellum Butterflies

Good evening all!

I wanted to share with you a card that we made in my last card class that featured birthday cards. This is a super quick card that just looks so pretty and elegant when done.


To make the main panel just stamp the flourish in versamark ink and then heat emboss with White Stampin Emboss powder. Add a few butterflies using the beautiful wings embosslit made using vellum and whaaa-laaa... that is it! Hope you enjoy it!

Stampin Up! Stamp Sets: Elements of Style, Occasional Quotes hostess set

Paper: Stampin Up! Sahara Sand, Whisper White, Vellum cardstock

Ink: Stampin Up! Classic ink pads in Early Espresso, Versamark

Accessories: Stampin Up! Heat tool, stampin emboss powder white, stamp a ma-jig, white taffeta ribbon, big shot, beautiful wings embosslit, glue dots

Pin It

Friday, April 1, 2011

SNEAK PEAK STEAL OF A DEAL!

Good evening all!

Stampin up! is offering a spectacular offer for April! They are giving us a sneak peak into the new Idea Catalog for 2011-2012!

This month with any $20 purchase you can purchase the new FOUR FRAMES STAMP SET that is one of th enew stamp sets that will be in the catalog:


AND you can also purchase a new Designer Series Paper called PAISLEY PETALS which is soooo pretty!


Isn't this an awesome deal? I am so excited to see the new catalog when it comes out!

Here are some of the awesome projects that Stampin Up's design team made with these two new products.


Aren't those amazing? I have my stamp set & paper on the way and can't wait until they get here to start playing! Don't miss out on this super fun deal! Order your's today!

Friday, March 18, 2011

Inspiration Challenge is posted!

Good evening everyone!

I am super excited because like I said in my last post, I suggested this week's website for the Inspiration Challenges that is posted at splitcoaststampers every Saturday. Everytime I look at the Kirklands website I see so many neat textures and designs that would make awesome cards. The challenge posted early so I can share my card!

Here is my card for the Kirklands Inspiration Challenge IC276 at splitcoaststampers


This is the trio of vases from Kirkland's that inspired my card:


As soon as I saw these I instantly thought of Stampin Up's Very Vanilla, Marina Mist,
Soft Suede and Early Espresso colors. Then I noticed the flourish looked a lot like the flourish from Elements of style! I love how it turned out! When I showed my husband he was like WOW... that looks just like it!

I needed a good card layout that used panels so I dug through the different card sketch challenges that splitcoast also puts on and ended up using their card sketch challenge #82. Here is the layout:


I had a very hard time picking one thing that I wanted to base a card on... Kirklands is a website I will definately look to for inspiration whenever I am in a slump! Thanks for using the site Stephanie! I look forward to seeing all the talented stampers out there and seeing what they come up with! Be sure to play along!

Stampin Up! Stamp Sets: Elements of Style & Just Believe

Paper: Stampin Up! Very Vanilla, Marina Mist, Soft Suede, Early Espresso, Crumb Cake

Ink: Stampin Up! Classic ink pads in Early Espresso

Accessories: Stampin Up! Versamark, Clear embossing powder, heat tool, sponges, stamp-a-ma-jig, early espresso grosgrain ribbon, eyelet border punch

Pin It

Thursday, March 17, 2011

Scentsy Recipe Page - Blueberry Muffins

Good morning everyone!

I am SUPER EXCITED because this upcoming Saturday I suggested the website for splitcoaststampers inspiration challenge and Stephanie, the lady that hosts it, wants to use it and asked me to create a sample card for the challenge page! YAY! I am waiting impatiently to show everyone so in the meantime I will have to show you this instead :)

I thought I would share with you my latest Scentsy Recipe scrapbook page that I created for my last Scentsy home party as hostess & door prize gifts. This one is to create the scent BLUEBERRY MUFFINS! Smells delicious! This doesn't use all Stampin Up! products but pretty close... and they are just too darn cute not to share!


I think it turned out super adorable! I hand drew the floor using a ruler, my grid paper & a chocolate chip marker. I love Whiff of Joy stamps they are so cute! The little mouse is named Henry and this is their Henry Celebrating Mouse stamp. I colored him and the cupcakes using prismacolor pencils & gamsol. Here are the Stampin Up! products I used:

Stampin Up! Stamp Sets: Crazy for Cupcakes,

Paper: Stampin Up! Night of Navy, Chocolate Chip, Very Vanilla Designer Series Paper from the Neutrals paper pack (LOVE LOVE LOVE this paper pack!)

Ink: Stampin Up! Classic ink pads in Brilliant Blue (retired, basic black

Accesories: Stampin Up! chocolate chip marker, stampin grid paper, blender pens for the blueberries with brilliant blue ink, close to cocoa marker (retired), stampin dimensionals

Pin It

Wednesday, March 16, 2011

Sweet Joy Fold Cards

Good morning everyone!

Today I wanted to share with you a couple of Joy Fold cards that I made using the branch stamp from the Easter Blossoms stamp set. I love the way the stamp looks coloring it with a white gel pen. Very pretty and it makes it just pop off the background colors! These are so easy to do and fun to see what it looks like on different colors!

My first one is done using PINK PIROUETTE and EARLY ESPRESSO cardstock and the early espresso designer series paper from the Neutrals paper pack (gorgeous papers!)


The next one I did was using SO SAFFRON & SOFT SUEDE card stocks and the soft suede designer series papers also from the same neutrals designer paper pack


The butterflies are made using the beautiful embosslits die and the vellum cardstock. I love how they both turned out! These would be great to use for many different occasions - Birthday, Thinking of you, Get well, Sympathy.

To create a JOY FOLD CARD this is what you do:

1. For your base cardstock - cut it at 4 1/4" x 8 1/2" and then score at 5 1/2"

2. For the base cardstock that will be the opening piece - cut it at 3" x 8" and score it at 4"

3. You will need designer series paper - 1 piece cut at 4" x 5 1/4" for the inside and then 1 piece cut at 2 3/4" x 4" for the front piece

4. On your card flap piece - you will need to have 1 piece of cardstock stamped or designer series paper whichever you prefer (branch piece in my samples) cut at 2 3/4" x 3 3/4" that is for one layer - if you want to do 2 layers besides the base cut it a 1/4" smaller so 2 1/2" x 3 1/2" - after this is done adhere to the outside flap piece - the flap needs to open from the left so like a backwards book.

5. For the inside of the card adhere a white or neutral color cardstock piece cut at 2 3/4" x 3 3/4" and stamp your sentiment on. Adhere to inside flap piece.

6. Adhere your flap piece to the card base and create a closure using a punch or small stamp design, like my "For You"

There is a great tutorial on Joy Fold Cards on splitcoast stampers which you can look at by clicking here:

Hope you enjoyed the cards today! If you want to try one here are the supplies I used:

Stampin Up! Stamp Sets: Easter Blossoms, Elements of Style

Paper: Stampin Up! So Saffron & Soft Suede, Very Vanilla & Pink Pirouette , Early Espresso & Whisper White. Designer Series paper Neutrals pack, Vellum Cardstock

Ink: Stampin Up! Classic ink pads in Early Espresso

Accessories: Stampin Up! White Gel Pen, 1 1/4" circle punch, 1" circle punch, big shot, beautiful wings embosslit, sponges, dimensionals, Chocolate Chip marker

Pin It