Showing posts with label Specialty Cards. Show all posts

Tuesday, November 4, 2014

Keep Calm and Stay....FOXY!

Hi Stampers!

Today we have our favorite Loves Rubberstamps Challenge starting... ANYTHING GOES! This is always so fun since we get to see a wide variety of amazing creations! This week we have THREE PRIZES up for grabs too so it will be a great week to play along with us!

Here is my project...


One of our Prize Sponsors this week is The Cutting Cafe and I adore Regina's files they are so fun and easy to use, even for people like me who do not have a cutting machine. I had been looking through her new release sets and found this super cute FOXY WORD card that comes in a big set called Hey Foxy.  It also comes with sentiments and an actual Fox Shaped card too! The sentiment I used is from Regina's set too :)

I decided to use the cute little Fox from Lawn Fawn's Into The Woods stamp set because I thought his little tail matched the tail in the sentiment really well. AND to be honest after cutting the letters and the front of the card I didn't want to fussy cut an animal too and since I have the matching Lawn Fawn Into the Woods die set that matches all the little critters in the stamp set...I used the die to cut the fox out :) I stamped the fox in Memento Rich Cocoa ink and then colored the fox using Copics - E15, E18 & YR27 and R20 for the ear. I then used a blender to go over the face and fur to give it more texture. I added some Pebbles Shimmer Chalks for the little cheeks.

Here is a look at the card open so you can see what the front looks like better...


The papers are from one of my new favorite Paper Packs from Doodlebug called Friendly Forest. I will be working on getting this line in the store this week. I used two of the Fall Assortment Sprinkles on the sentiment. For the little fox...I didn't want any copic marks showing on the back so I cut another fox using the die and glued them together. For the back of the fox I used this paper that comes in the paper pack too....


I used the little fox pattern which is so SUPER CUTE!! I love it! Reminds me of the song - WHAT DOES THE FOX SAY....which I sang over and over as I made my card - LOL! :)

Here is a close up of the little Lawn Fawn Fox:


We hope you get to play along with us this week! Thanks for stopping by!

Laura

I will be entering this into the Following Challenges:

Lawn Fawn Landscaping Challenge - Fall or Pumpkins
Bunny Zoe's - Animals
Craftin Desert Divas - Brown and Orange
Incy Wincy Designs - Inspired by a Song, Book, or Movie - What Does The Foxy Say?
Through The Purple Haze - Anything Goes
613 Avenue Create - Anything Goes
Fashionable Stamping Challenges - #85 Animals

Cupcake Inspirations Challenge - #285


I used the following supplies on my card:

Doodlebug - Forest Friends Paper Pack
Doodlebug - Fall Assortment Sprinkles
The Twinery - Lilac Twine


Wednesday, February 19, 2014

Crafty Sentiments Designs - SNEAK PEEK!

Hi Stampers!


Today I have a cute SNEAK PEEK for you at one of the new release stamps coming from Crafty Sentiments Designs!

This cutie is called Prom Dress and she will be available for purchase on Feb. 22nd:


I decided to try one of the projects that has been on my "MUST TRY SOMEDAY" list and that is a Faux Book Card or Book Shadow Box, whichever you want to call it! I am pretty happy how it turned out...here are some other pictures to show the different sides...


                                    If you want to create a Faux Book here are the instructions:

Cut the cardstock for your cover at 5 1/4" x 9 1/2" and then score it at 4 1/4" and 5 1/4"
The Designer Paper for the cover is cut at 4" x 5" 
The Designer Paper for the Spine and inside spine is cut at 3/4" x 5"

To create your book pages you will need to cut:
2 cardstock pieces that measure 4" x 10"
2 cardstock pieces that measure 5" x 10"

You are going to score all four of these every 1/2" to the very end.
To create the book pages - take each piece and accordion fold these back and forth - be sure
to use your bone folder between each fold to get nice, crisp folds.
After you have the piece all folded - sponge the edges with ink if you wish.

Then take one long piece and one short piece and "marry" them so they make a right angle, 
sliding them together so the pages alternate. Glue the outside flaps to hold the pages in place.
Add the other long and short end to create your book pages, gluing each outside flap together
until you have a full rectangle. 

Place your decorated insert onto the inside back cover and then glue your book pages over it.
To create the decorated top of the pages, just cut strips of cardstock and punch one edge.
Glue down on top of the book pages, miter the corners of the two top strips in you wish.

Then just decorate as you want!


Thanks for stopping by today! Be sure to visit the INSPIRATION BLOG and see MORE Sneak Peeks from the other Design Team Members! 

Laura

I will be entering this in the following challenges:

Papertake Weekly - Lovely Layers
Craftin Dessert Divas - Linky Party 25 Glitter
Crafting From The Heart - Anything Goes Use Flowers
Craft Your Passion Challenges - Girly Girl
Creatalicious Challeges - Pearls & Glitter
CMC Copic Challenge - Anything Goes
Delicicious Doodles - Ribbon & Bling
Wags N Whiskers - BINGO - Line Glitter, Ribbon, Red

Wednesday, January 29, 2014

I ♥ Chocolate

Hi Stampers -

Just a quick post from me this afternoon to share my Design Team Project for The Cutting Cafe. This week was all about ... KISSES! HERSHEY's KISSES that is! This week we could chose from an assortment of files that all had to do with those yummy chocolate treats :)

Now...when we were given this assignment I was torn between two of my favorite Mo Manning images that both would go perfectly with this theme. So what do you do when you can't decide? USE BOTH! 

So I decided to make a Criss Cross Card that way I could have one on the outside and one on the inside :)


I used the HERSHEY KISS SHAPED CARD TEMPLATE for the large Kiss on the front of my card. Instead of making the shaped card I used it as a layer on my card. I wanted the kiss to look like someone ripped some of the paper off and took a bite out of it - LOL....maybe the culprit is little Ms. Chocolate Face! My sentiment is from the Hershey Kiss Treat Box File.


Here is a look at the inside insert:


This cute image is another Mo Manning image that is available through her Penny Black line called Kisses. I wanted the inside to kind of look like an evelope so I cut up two different sentiments from the Hershey Shaped Card File and placed them around the image. My little postage style stamps are from a little Bo Bunny set called Prairie Chic Collection Clear Stamps. If you notice on the insert in the bottom right corner and also on the large Hershey Kiss on the front - those little circle punch images are from the Hershey Kisses Valentine Bottoms. 

And finally a look at the whole thing...


Thanks for stopping by today! I better get this posted :) Be sure to visit The Cutting Cafe Inspiration Blog to see how my Design Teamies used their files! 

Hugs!
Laura

I will be entering this in the following Challenges:

Fan-Tastic Tuesday - Make It Cute or Sweet
Just Inspirational Challenges - Swirls
Party Time Tuesdays - Anything Goes
Sweet Stamps - Lace and Hearts
Crafting From The Heart - Fancy Folds Anything Goes
Glitter N Sparkle - Bling It Up

Saturday, October 19, 2013

Coffee! Coffeee! Coffeeeee!!

Good Morning Stampers!!

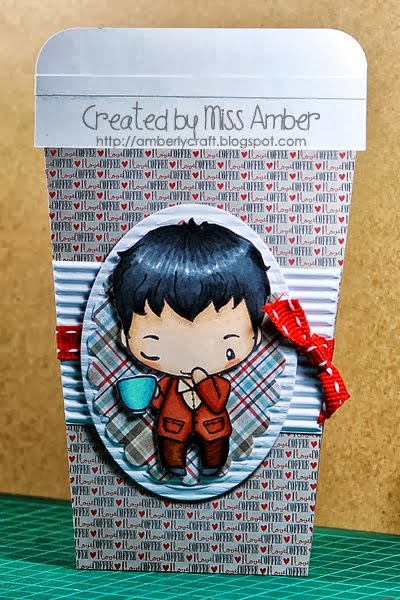
We have a special COFFEE TREAT for you this morning! As you can tell I am excited as I love all things coffee! I am sipping a ginormous cup of Amaretto Coffee this morning... as we speak... with some hot chocolate in it to make it more of an Amaretto Mocha. No booze in it though...LOL...just Amaretto FLAVORED :) I am also drinking it out of my 20 oz soup mug that looks exactly like a massive, over-sized coffee mug soooo that is what I use it for - LOL! Half the pot in one cup...yes please! LOL! I think if they didn't want me to use it as a coffee mug...it shouldn't look like one :)

Indah has created an amazing amazing amazing and absolutely ADORABLE on so many levels project and video tutorial for you today!! Take a look...


Now what did I say...isn't this AMAZING!!! Indah created this cute little card using Cafe Ian from The Greeting Farm! I love this image and I think he is giggling at the size of my coffee cup since it IS almost as big as my head - LOL! Indah stamped him in memento tuxedo black ink before coloring him with copics. Her coloring is stunning! I really love the corrugated layers behind the image! C-H-E-C-K O-U-T that super cute designer paper! I really need to find some like that! It is so cute and it is totally one I would hoard use :)

Now check out Indah's Video Tutorial on how she created this super cute project!!


Be sure to leave Indah some love on her blog today and let her know what you thought of her project and video!! I know it mean a lot to her to hear what you think :)

Thank you so much for stopping by and having some coffee with me :)

Java a great day....I know I know...but I HAD to throw a coffee pun in here somewhere :D
Laura

Saturday, October 12, 2013

Video Tutorial - JOY FOLD with Lovey Dovey!

Hi Stampers!

Hope you are enjoying your weekend so far! It is time for this week's Loves Rubberstamps Video Tutorial created by our super talented Video Designer - Indah! I really enjoy Indah's videos and I hope that you are enjoying them as well! Sometimes it really helps to see the crafty process in action and learn some new techniques, card styles, or even just pick up some new tips and tricks :)

This week Indah has created a video on how to make this Joy Fold Card...


OMGosh! I think this is the CUTEST! This is one of my FAVORITE Greeting Farm images that is part of the Oliver and Amelia Lovey Dovey set! Indah's coloring is stunning! I love that little doily that she popped the image up on. It is almost a cross between a doily and a rosette. Such gorgeous papers too! Love Love Love little miss Lovey Dovey Amelia :)

Now let's see how Indah created this cutie!


Here is a list of products that Indah used on her project that are available from our store:

The Greeting Farm - Lovey Dovey
Memento Tuxedo Black Ink
Copic Markers
Spellbinders Dies

Thank you so much for stopping by today! I hope you enjoyed Indah's Video and have a great rest of the weekend!
Laura

Saturday, September 14, 2013

Video Tutorial - TRIPLE EASEL CARD

Happy Saturday Stampers!

We have another AWESOME AWESOME video tutorial for you today by Indah! This week she is sharing with you how to create a Triple Easel Card! I was so excited when she said that this was her topic for this week because I have never made one and I think they are so neat looking! Here is a picture of the gorgeous card that she will be showing you how to create!


Indah's beautiful card used the super cute Garden Anya from The Greeting Farm! I love the way Indah colored this image up and the papers are beautiful! Here is the video on how you can create this stunning Triple Easel Card!


Enjoy! Thanks for stopping by today and have a great weekend!
Laura

Tuesday, September 3, 2013

PEEK-A-BOO

Hi Stampers!!

If you are looking for my Cutting Café Design Team Project & Loves Rubberstamps Challenge Post - Click Here :)

Today starts a new Challenge at Crafty Sentiments Designs! This week I am hosting the challenge, and it is my first time as a host there. Since September is here already, and the days will start turning cooler...I thought it would be fun to break out those pretty fall patterns and colors to use on your projects! So this week we want to see your FAVORITE FALL PATTERNS or FAVORITE FALL COLORS... or use both together!!

Here is my Inspiration Project that I created ...


This is a special card called a PEEK-A-BOO card and this was my first time trying one out! It really wasn't as hard as I thought it would be. The cool thing about this is when you open it up - the image changes! I followed a tutorial that I found on the mega-talented blog by Norma Lee - From My Craft Room. Click here to check it out.

For my cover I used one of my favorite Digi stamps from Crafty Sentiments Designs called Mia. I think she is so cute with her blowing hair and would be perfect to use for Fall or Winter cards. I colored her with copic markers and one spectrum noir marker - DG2 (I think that is the number - it is a light green). I added some "fur trim" to her coat and boots using liquid applique. You can see I added quite a few of my favorite fall patterns on the cover... Houndstooth, Plaids, and Gingham! My little cornstalks were cut using the Die-Namics Cornstalks Die and the flower was made with my super favorite Die-Namics Die - Loopy Bloom! The sentiment on the front is from the My Favorite Things stamp set called Thankful Leaves.

Here is a look at the inside as you are opening the card... See the new image sliding over?


And here is the page fully opened with the new image in place!


For the inside image I used another Crafty Sentiments Designs Digi stamp called Blitz. She is also perfect for Fall or Winter Cards I think! I kept the inside pretty simple. I added another cornstalk from my Die-Namics Cornstalk Die. Mine is growing buttons not corn - LOL! I thought these were cute and matched my papers so what the heck, it is a new corn species called Crafty Corn :) - LOL! I added another die cut leaf to the inside. I forget to say that my leaves are cut using the Die-Namics Die called Fall Leaves. My sentiment is from the My Favorite Things Stamp set called Flower Silhouettes. I also used another favorite fall pattern ... Stripes!
 
Here are some closer looks at the images and my newly invented...Crafty Corn - LOL!


I hope that you will play along with us this week! It will be a lot of fun! Thanks for stopping by today!
Laura
 
I will be entering this in the following challenges:
 
Bearly Mine Challenges - #102 Anything Goes
Papertake Weekly - Anything Goes
Through The Craft Room Door - Anything Goes
Addicted To Stamps - Anything Goes
613 Avenue Create - Anything Goes
Challenges 4 Everybody - Anything Goes
Quirky Crafts Challenges - "I Like to Move It, Move It"
 Robyn's Fetish Challenges - Add Some Leaves
The Corrosive Challenge - All About Fall
The Squirrel and the Fox - Spring or Fall
Crazy 4 Challenges - Use Buttons or Bows
My Sheri Crafts - Fall Colors
Sister Act Card Challenge - Anything Goes
4 Crafty Chicks - Squares
Delightful Challenges - Make The Cut
Simon Says Stamp - Anything Goes

Wednesday, August 21, 2013

Crafty Sentiments Designs - Sneak Peek Day 3!

Hi Stampers!


This is the final day of the Crafty Sentiments Designs SNEAK PEEKS. On August 22nd they are releasing 10 new stamps you will love, including a new character! I am super excited for this release - such gorgeous stamps so far!

Today you get to see the upcoming stamp called Princess Mask. Here is my inspirational project using this beautiful stamp:


This is my first time making one of these "Magic Cards" as they are called. The tutorial that I followed for this is written by Marianne and you can find the tutorial here. There is also an awesome video on YouTube done by Tracy MacDonald that is based on Marianne's tutorial as well. 

The Designer Paper that I used is my newest addiction :) It is the Gorjuss Girls Paper pack that we will be getting in the store soon! The edges are punched with a Martha Stewart Punch and then I added pearls. I used a Spellbinders die to mount my image on. There are some prima flowers, pink rhinestone bling flourishes and a Tim Holtz Tag that I distressed with Black Soot Distress Ink. I also added a few branch punchies from the Martha Stewart Branch punch with my flowers as well. 

Here is a look at the inside of my card: The middle section flips up. The sentiment is from Tim Holtz.


Here is a closer peek at Princess Mask.


Be sure to visit the Crafty Sentiments Designs Inspirational Blog to see even more adorable projects by the Design Team and some special Guest Designers!

I hope you enjoyed my sneak peak creations over the last three days! If you missed the any you can see them here - Off  To The Ball - and the other is Lilly Fairy.

Thanks for stopping by today!
Laura

I will be entering this in the following challenges:

Jo's Scrap Shack - Anything Goes
Sister Act Card Challenge - Anything Goes
Love To Create - #79 Fancy Folds
Through The Purple Haze - BINGO - Bling, Dies, Flowers
Addicted To Stamps - Shabby/Vintage
Challenges 4 Everybody - Anything Goes
Totally Gorjuss - Dies and Punches
Totally Papercrafts - Favorite Colors - Rich, Deep Purples & Black

Tuesday, August 20, 2013

My FIRST Paperbag Card!!

Hi Stampers!

This is my THIRD and final post for you today! Be sure to check out my Loves Rubberstamps Challenge Inspirational Project AND my SNEAK PEEK project for Crafty Sentiments Designs - Lilly Fairy!

This week at Crafty Sentiments Designs the challenge is COLORFUL! I decided to try my hand at making my very first Paperbag Card! I have just fallen in love with making these! They are so fun and a great way to showcase a few of your favorite images!

I will warn you now...this post is PICTURE HEAVY!

Here is the cover:


This image is called Tess Summer Fun. I think this image is so pretty and she was so fun to color!  Here is a Close Up:


This is the inside when you first open the paperbag:


Here is a closer look at the the page on the left side of the paper bag...


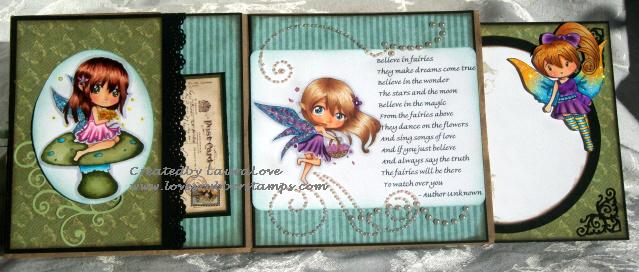
This image is called Flora With Flowers and is one of the Manga Digi Stamps from Crafty Sentiments Designs. I love this series of stamps - they are so cute and fun to color :)


On the little pull out post card the back side is a white area to journal or write a note on. The stamped image is from a Tim Holtz stamp.

Here is the page on the right with the Fairy Poem that I printed from the Internet:


This image is called Flora and again is from the Manga Digi Collection. I added some stickles to her wings and lots of pearl flourishes. Here is a closer look...


I also created a pull out  insert that goes in the opening of the bag...


The image on the insert is called Taski. I think she is so cute! The image again is the Tim Holtz stamp that I used on the journaling card. The black flourish corners are created using the La La Land Filigree Corner Die.


Here is a closer look at Taski. I added stickles to her wings from some bling. 


And finally here is the back cover...


I kept the back pretty simple. All the Designer papers that I used are from Graphic 45.

I hope you enjoyed my project! I am looking forward to making more of this style project! They are perfect for sliding a little stamp or other small gift inside with the insert page as well!

Come play along with us this week at Crafty Sentiments Designs - we want to see how colorful you can make your project!

Thanks for stopping by for all THREE of my posts :) Have a great day!
Laura

I will be entering this in the following challenges:

Bunny Zoe's Challenges - BINGO - Line Made Ribbon, Die Cuts & Tag
Card Mania Challenges - #27 Favorite Embellishment - Filigree Corner Die Cut
Craft Your Passion Challenges - #176 Summer Flowers
Cutie Pie Challenge - Anything Goes
Lexi's Creations - Sparkle & Shine
Love To Create Challenge Blog - Fancy Folds
Love To Scrap Challenge - BINGO - Line Made Bling, Die Cuts & Flowers
Paper Playtime - #17 Use Pearls
Stamp & Create - Glitter 
Challenges 4 Everybody - Anything Goes
Come & Get It Challenges - Things With Wings
Great Impressions Challenges - Square Cards
The Squirrel & The Fox - Whimsical 
A Gem of a Challenge - Punch It Out - Dies or Punches 
Color Me Creatiive - Anything Goes
Crafty Calendar Challenge - Anything Goes
Our Creative Corner - Words, Words, Words
Totally Gorjuss - Dies or Punches
Card Crafter's Circle - Winged Things
Jo's Scrap Shack - Anything Goes
Sister Act Card Challenge - Anything Goes
Cards Galore Challenge - BINGO  - Line Made Flowers, Die Cuts, Summer
Ladybug Crafts - Say It With Flowers
Aud Sentiments - Anything But a Birthday Card
Crafty Ribbons Challenge - 3 of something - 3 different designer papers
Southern Girls Challenge - Things that Begin with F - Fairies!
Crafts & Me - Anything Goes
The House That Stamps Built - Things With Wings
Inky Impressions - Anything With Wings

Sunday, July 14, 2013

Sensational Sunday Inspirational Hop + CANDY!

Hi Stampers,

Hope that you had a great weekend! Before I can show you my project we need to announce last week's winner!

This week the Sensational Sunday Sweet Spot was on Marcy's Blog...


Here are your random numbers:

10

Timestamp: 2013-07-14 08:54:04 UTC

Congratulations to Gale - Just make Something Already - who said: So beautiful!! Great coloring and the bling is so pretty.

Please send me an email at lovesrubberstamps@yahoo.com by July 20th and I will send you your code for a $10.00 gift voucher to the Loves Rubberstamps store!

Before we start the Hop I want to let you know we are having a DESIGN TEAM CALL! You can see all the perks and how to apply in THIS BLOG POST!

Welcome to the Loves Rubberstamps weekly Sensational Sunday Blog Hop! The Design Team has created some gorgeous projects for your Inspiration. Check out each link and leave a comment. If you get lost along the way, each stop will have a full list of links. One of the Design Team posts is the hop's Sensational Sunday Sweet Spot and a name will be drawn from that list of comments to win a $10 Loves Rubberstamps Gift Voucher!  Remember, you have til 8:00 pm CST Saturday to leave your comments!

Here is my Inspirational Piece for you today...


 This card is called a Shaped Double Tag Card. It creates double pouches so you can add a tag in each slot. I only created one insert because I made it as a Get Well Card and I thought it would be cute in the upper pocket to add a packet of Lipton Chicken Noodle Soup :)

For the outside I used the Tilda In Key Largo Stamp from the Magnolia Stamps Summer Memories Collection. I actually have this collection in and will be adding it to our store later this week. I have a few other things I need to finish listing in there first :) I colored it with my copics and created the sky. I tried to add some purple and pinks into my clouds this time. I chose the designer paper because it looked like little Suns and I wanted it to remind you of a hot summer day at the beach! My Waves were created using the My Favorite Things Wave Die-Namics and the Die on the front is Spellbinders.


 Here is a look at the Insert out. For this one I used the Magnolia Stamp called Pearl Tilda which is also from the Summer Memories Collection. This is one of my favorite series :) I tried something new with her hair which is adding some teal to the brown. Here is a closer look...


 I got a tad carried away with my doodle dots on her tail - LOL!

Here is a close up of my Cover Image:


Now be sure to check out what the other Designers have for you today! Don't forget to leave comments on all the blogs for the most chances to win! Enjoy your Sunday and thanks for stopping by!
Just in case you get lost along the way...

Laura - Loves Rubberstamps Inspiration Blog
Dangina
Athina
Shanna
Lydia
Marcy
Ivonne

Have a great time!
Laura


I will be entering this in the following challenges:

Magnolia-Licious - Some Like It Hot
Midweek Magnolias - Wish You Were Here - Seaside/Beach Challenge
Marvelous Magnolia - Anything Goes - Beginner Section
Stamp and Create with Magnolia - Let's Get Wet
Tilda's Town - Anything Goes