Showing posts with label Video Tutorials. Show all posts

Saturday, December 14, 2013

Pizza Box Tutorial

Happy Saturday Stampers and Friends,

Wow, who feels like December has been racing by?  It's amazing how much faster this time of year seems to go by for those of us who have procrastinated the inevitable, lol.   I still have some shopping I have to go out and do, not too much, but some.   So I plan to go out today and get it out of the way.  We are also going to decorate our tree that has been up for a week, lol.   So it should be a full and fun weekend for me.  So thankful I am off today! 

I have a great Video Tutorial to share with you today by our Design Team Member Indah.


Here is Indah's finished product:


This is so super cute and so timely to wrap all your little items in total cuteness!  I love it. 
Laura has been super busy these past few weeks.  If you are waiting for a package, please be patient.  She is either waiting for items to be delivered to her, or frantically unpacking and packaging up orders as fast as she can, in between her two jobs.  If you are waiting to hear back from her re: an email you have sent, she is also trying to catch up on those as well.  It's a busy time for all of us, and trust me, her customers are at the top of her priority list. So be patient.  :)
She is also getting new items in the store and unpacking and listing as fast as she can.  Check out the New Items here.    And don't forget about our Current Challenge going on, Anything Goes with a Christmas theme!  In between parties, I hope you have a chance to get inky! 
Thanks for Looking in on us and I hope you come back tomorrow for our blog hop! 
Holly

Saturday, December 7, 2013

VIDEO TUTORIAL - Creating a Coordinating A2 Envelope & Liner

Hi Stampers!

I hope you are staying warm where you are this weekend...Right now the windchills are -18 below zero here....BRRRR. These are the days I wish I could just stay home in my warm fuzzy jammies all day, snuggling under my blanket and drinking coffee - LOL!

Today we have a super cute project from Indah using a Limited Edition Bean image from The Greeting Farm called Hatter Bean.


I think that Indah's coloring is gorgeous on this cutie! In Indah's Video Tutorial today she will be showing you how to create a matching A2 size envelope to coordinate with your card, and how to do an envelope liner!

Check it out...


Thanks for stopping by today and I hope you stay warm :)

Laura

Saturday, November 30, 2013

Faux Metal Embossing

Hi Friends and Stampers,

Did you survive your Holly-Day?  How about your Black Friday Shopping?  I want to hear all about it!  Before I get started on today's inspiration, I wanted to remind you all about our Black Friday weekend special:

until MIDNIGHT - Monday December 2nd!!
You can save 25% off any size order!! Just use the coupon code:


BLACKFRIDAY
There's a little something you can smile about!  And here is another!  Indah has put together a cute video tutorial on how to emboss Faux Metal words.


And here is her finished project:


This is just adorable!  I love the cute image and the little puppy and great scene she came up with here. And of course her coloring is fabulous.


Thanks for looking in on us today, be sure to stop in tomorrow for our Blog Hop!

Holly


Saturday, November 23, 2013

Shadow Card

Hi Friends and Stampers,

As promised, here is this weeks video tutorial by our Design Team member Indah!


And here is her fabulous end result.


Isn't that adorable?  I want to try one myself and decorate the inside!  Indah used the following products for her project:

Miss Anya Scarves from The Greeting Farm
Memento Tuxedo Black Ink
Copic markers

But before you are completely sold on the image, check out the NEW ITEMS Laura has added to the store.  There is so much eye candy there it will make your eyes bulge!  It did mine! lol.   And please do not forget to participate in our Challenge this week, I want to see your Shabby Chic or Vintage projects! 

Thanks so much for checking in on us today and don't forget that tomorrow is our Blog Hop and a chance to win some more!  Yippee.

Holly

Saturday, November 16, 2013

Video Tutorial - TISSUE HOLDER

Hi Stampers!

Hope that your weekend is going well! Seems like F-O-R-E-V-E-R since I chatted with you because Holly has been doing such an AWESOME job doing the Inspiration posts :) But I guess it has only been since Tuesday - LOL! I have been busy, busy so it really helps me out a lot to pop over here to do a post and see that she has done it - especially this time of year when orders are a lot heavier with the Holidays coming! And WAAAAAY too fast I might add!!

Have you done any Christmas Shopping yet? I haven't and I was mortified to realize that my husband and I only have TWO paychecks until Christmas!!! We each only get paid twice a month and both on the same day, so ... YIKES!! I am going to have to be figuring out, first, what I am going to get and then budget it out between the two. It wouldn't be so bad except my kids are older, so everything they want is like $600 - LOL...you know chump change stuff - LOL!

Every year I swear I am going to make some hand made gifts too. I really need to do that in January and make something each month instead of deciding about now that I really should try and make some things, and then having no time to do them. LOL! I never learn - LOL!

Today we have a GORGEOUS project for you by our Video Designer - Indah! She created this absolutely adorable Tissue Holder which is PERFECT for this time of year when everyone seems to catch colds.


I think this is such a cute project! I love these Anya images from Miss Anya Scarves by The Greeting Farm that Indah used! They are one of my favorite collections. I think that Indah did a beautiful job coloring Miss Anya - really pops against the beautiful papers that she chose!

Indah colored Miss Anya with copic markers after stamping her using Memento Tuxedo Black Ink. This is one of the best inks to use when you are going to color with any type of alcohol marker!

Here is the Video Tutorial on how you can make your own tissue holder...


Thanks for stopping by today! Have a great day!

Laura

Saturday, October 26, 2013

Video Tutorial - TREAT POUCH

Hi Stampers!

Hope you are having a great weekend! I have some plans to get inky this afternoon and get some projects made (I HOPE) and then I really want to work on my craft studio some so I can get moved into it one of these days and be able to stop crafting out of boxes and piles on my desk - LOL! It would really help to be able to see what I have and what I need a lot easier - that is for sure!

Today is Saturday which means that we have a super fun new Video Tutorial for you from Indah! This week she is going to share with you how to create this adorable treat pouch:


You can really use these for any occasion you might need a little treat gift for! You can just customize them with papers and stamps that coordinate with the look you are going for!  That stunning rosette on the front was created using the My Favorite Things Die-Namics 1/4" Rosette Die and Spellbinders Dies.

Here is the Video Tutorial to show you how you can do these yourself!


This little treat pouch would be a PERFECT project for this week's Loves Rubberstamps Challenge of A Trick or a Treat! We hope you will play along with us!

Have a wonderful day all and thanks for stopping by today!
Laura

Saturday, October 19, 2013

Coffee! Coffeee! Coffeeeee!!

Good Morning Stampers!!

We have a special COFFEE TREAT for you this morning! As you can tell I am excited as I love all things coffee! I am sipping a ginormous cup of Amaretto Coffee this morning... as we speak... with some hot chocolate in it to make it more of an Amaretto Mocha. No booze in it though...LOL...just Amaretto FLAVORED :) I am also drinking it out of my 20 oz soup mug that looks exactly like a massive, over-sized coffee mug soooo that is what I use it for - LOL! Half the pot in one cup...yes please! LOL! I think if they didn't want me to use it as a coffee mug...it shouldn't look like one :)

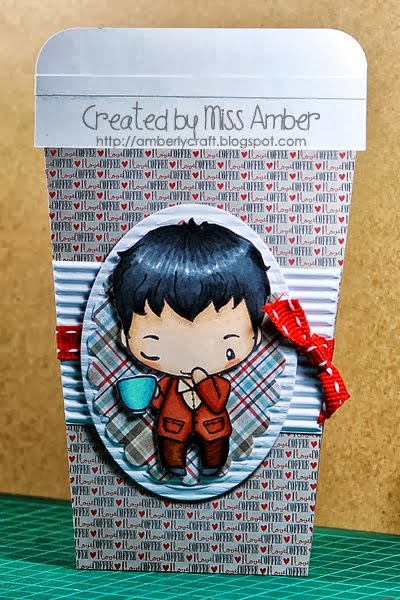
Indah has created an amazing amazing amazing and absolutely ADORABLE on so many levels project and video tutorial for you today!! Take a look...


Now what did I say...isn't this AMAZING!!! Indah created this cute little card using Cafe Ian from The Greeting Farm! I love this image and I think he is giggling at the size of my coffee cup since it IS almost as big as my head - LOL! Indah stamped him in memento tuxedo black ink before coloring him with copics. Her coloring is stunning! I really love the corrugated layers behind the image! C-H-E-C-K O-U-T that super cute designer paper! I really need to find some like that! It is so cute and it is totally one I would hoard use :)

Now check out Indah's Video Tutorial on how she created this super cute project!!


Be sure to leave Indah some love on her blog today and let her know what you thought of her project and video!! I know it mean a lot to her to hear what you think :)

Thank you so much for stopping by and having some coffee with me :)

Java a great day....I know I know...but I HAD to throw a coffee pun in here somewhere :D
Laura

Saturday, October 12, 2013

Video Tutorial - JOY FOLD with Lovey Dovey!

Hi Stampers!

Hope you are enjoying your weekend so far! It is time for this week's Loves Rubberstamps Video Tutorial created by our super talented Video Designer - Indah! I really enjoy Indah's videos and I hope that you are enjoying them as well! Sometimes it really helps to see the crafty process in action and learn some new techniques, card styles, or even just pick up some new tips and tricks :)

This week Indah has created a video on how to make this Joy Fold Card...


OMGosh! I think this is the CUTEST! This is one of my FAVORITE Greeting Farm images that is part of the Oliver and Amelia Lovey Dovey set! Indah's coloring is stunning! I love that little doily that she popped the image up on. It is almost a cross between a doily and a rosette. Such gorgeous papers too! Love Love Love little miss Lovey Dovey Amelia :)

Now let's see how Indah created this cutie!


Here is a list of products that Indah used on her project that are available from our store:

The Greeting Farm - Lovey Dovey
Memento Tuxedo Black Ink
Copic Markers
Spellbinders Dies

Thank you so much for stopping by today! I hope you enjoyed Indah's Video and have a great rest of the weekend!
Laura

Saturday, October 5, 2013

Video Tutorial - MONEY HOLDER CARD

Hi Stampers!

Today we have a new weekly VIDEO TUTORIAL for you created by our mega-talented Design team member Indah! This week Indah will be sharing with you how to create this adorable Money Holder Card ...


I love the "Dude" designer paper that is so awesome! Indah's coloring is absolutely gorgeous too! I love the embossed numbers that she layered her image on too - such a great subtle accent that just pops with the image! LOVE it! The awesome thing about this Money Holder is that you can use it for any gift giving occasion - just change up the designer papers and images to match the occasion you are giving it for!

Here is Indah's Video on how you can create your own Money Holder Card!


Here are the supplies that Indah used to create her adorable project:

Some Odd Girl - Big Day Tobie
Memento - Tuxedo Black Ink
Copic Markers
Spellbinders Dies

Be sure to check out the other Video Tutorials on Indah's YouTube Channel - missambercrafts that you may have missed and visit her blog - AMBERLYCRAFT to let her know how you are liking the Videos :)

Have a great day and be sure to visit tomorrow for our Sensational Sunday Blog Hop!
Laura

Saturday, September 28, 2013

Video Tutorial Saturday

Hello Friends and Stampers!

I am so excited about today's Video Tutorial from our Design Team Member Indah!  I love this tea bag holder!   Your could also use it for gift cards and what a fun way to give them! 


Miss Anya Scarves from The Greeting Farm


Ah Ha!  That's how to make the flurry super fluffy looking! lol. 

Please join us tomorrow for our Blog Hop!

Thanks for looking in on us today.

Holly

Saturday, September 14, 2013

Video Tutorial - TRIPLE EASEL CARD

Happy Saturday Stampers!

We have another AWESOME AWESOME video tutorial for you today by Indah! This week she is sharing with you how to create a Triple Easel Card! I was so excited when she said that this was her topic for this week because I have never made one and I think they are so neat looking! Here is a picture of the gorgeous card that she will be showing you how to create!


Indah's beautiful card used the super cute Garden Anya from The Greeting Farm! I love the way Indah colored this image up and the papers are beautiful! Here is the video on how you can create this stunning Triple Easel Card!


Enjoy! Thanks for stopping by today and have a great weekend!
Laura

Saturday, September 7, 2013

Video Tutorial - JEANS TEXTURE TUTORIAL

Hi Stampers!!

Today we are debuting with a new format for your inspiration... VIDEO TUTORIALS!! You will see a range of topics covered and they will be every Saturday! I am SOOO EXCITED for this!

 Be sure to subscribe to her YouTube Channel - missambercrafts - so you don't miss any :)
Indah's video today is on how to create a Blue Jeans Texture on your colored images! Here is Indah's finished card that she creates in the Video! Isn't this beautiful?? LOVE it! The colors are so vibrant and adorable! She uses the super cute image from Some Odd Girl called Music Mae!

Here is Indah's Video Tutorial - JEANS TEXTURE


I hope that you enjoyed Indah's first video! I think this will be such a fun, new and exciting way to share some inspiration with you! Let us know what you think!!

Have a great day all and wish us luck in the big race tonight! Thanks for stopping by!
Laura

Sunday, October 7, 2012

Sensational Sunday Inspirations & CANDY!

Hi Stampers!

I am SUPER EXCITED because today is our very FIRST .... Sensational Sunday Inspirations post! This is going to be a NEW weekly feature here on our blog! We want to start your week off with a huge blast of inspiration from our mega-talented Design Team!

Also... EVERY SUNDAY... you will have the chance to win a gift voucher to the Loves Rubberstamps Store.... just for leaving a comment on the post! Winner will be chose with random.org and will be announced on the following Sunday's post!

To try and win a $5.00 Gift Voucher - Just leave a Comment on this Post!

To try and win a $10.00 Gift Voucher - (we will check these)
                                       1. Be a FOLLOWER of this Blog
                                       2. Be a FOLLOWER of The Loves Rubberstamps Challenge Blog
                                       3. Be our fan on Facebook
                                       4. Add our Blog Candy Badge to your blog
                                       5. Leave a Comment on this post to show love to the DT and let
                                   us know that you are our "Super Fan" and have done these 5 things!

Here we go....


This is ABSOLUTELY ADORABLE! I absolutely love these two colors together after seeing Shanna's card! This is a color scheme that I wouldn't ordinarily choose on my own (yellow is hard for me to use with anything other than browns - LOL) but this is just the cutest the way Shanna put it all together! Her coloring is GORGEOUS and I love how her roses match the pretty designer paper.


OMGosh! These are SUPER CUTE!!! Katie did an awesome job paper piecing her image with the Apple Cider papers, which is my favorite designer paper right now. I am a complete sucker for cooking and baking related projects because I love to scrap favorite family recipes. I haven't tackled tag making yet because most tags I see are very loaded with so many layers and textures that they intimidate me a little....ok a LOT - LOL! So I am really loving how Katie kept her tags very simple yet they are packed with cuteness! I would definately try something like those!


This is such a sweet card! I love the soft pretty colors that Marcy choose along with the embellishments!I love the pearl flourish pieces that mimic the flourishes in the image. One of the first things I was drawn to with Marcy's designs was her coloring ability which is just gorgeous! She does an amazing job!


Lydia Walker

This is sooooo cute! I LOVE the colors that Lydia chose and those accent flowers! Now can you believe that Lydia is brand new to coloring images with markers? She did a AMAZING job on this super cutie! I would never have guessed that she is a newbie to coloring! I really love the tones that she got in the hair, which is the hardest for me. I am still learning how to color with markers myself.  Lydia and I will learn and grow our talent together - LOL! I am so glad that Lydia decided to venture into the coloring world because this is absolutely adorable!


This is the absolute cutest little treat holder!! Holly was super lucky to be able to take a class with Irina Blount who owns La-La Land and this was one of many adorable projects that they made! Aren't these colors gorgeous? I love all the layers and the doily which reminds me a super bubble from the bath! Holly's coloring is amazing too! Make sure that you visit Holly's Blog because she has links to the instructions on making one of these cuties for yourself!


I love both of Olivia's super fun cards! Her cards always make me smile with her use of bright colors and fun patterns!

Olivia's Abbie card is so cute with the bright reds and blues and I really love how she outlined her sentiment. I will have to remember that trick because sometimes I accidently get ink around the edge of my rubber while inking and it transfers to my paper :)  Then instead of tossing it out ... I will save it for a card that I want to ink around the sentiment... Awesome!

Now... when it comes to Paper Piecing... Ms Olivia is the QUEEN! She has so many projects, like this cute witch ,where she uses this technique! It is one of her favorites and I can see why... she does it beautifully! I LOVE LOVE LOVE that cute witch dress! This is a super cute and fun Halloween card!


How cute is Kelli’s card? ADORABLE!! Kelli used one of the cutest Saturated Canary images I think anyway! She did a beautiful job coloring her up to match the vibrant purples and super fun, funky patterns on her papers! This would be an awesome birthday card for some lucky lady!

Here is an AWESOME video tutorial created by Katie Skiff using My Favorite Things - Die-Namics Lollipop Treats Die and Matching Stamp set!  TOO COOL!!


I hope you enjoyed our first Sensational Sunday Inspirations! You can visit each of our designers blogs for more information on their projects and to leave them some love by clicking their name! Don't forget to get your name in for our drawing by commenting on this post!

I hope you all had a great World Card-Making Day yesterday! I had to work so my world cardmaking day will be celebrated today... LOL!

Thanks for stopping by!
Laura

Pin It

Sunday, June 10, 2012

My Sunday Shares - June 10th

Good Afternoon Stampers!

Hope you enjoyed your weekend...mine is just starting so I treated myself to sleeping in this morning :) You have to do that every now and then I think! I have a LOOOONG list of things I need to get done around the house today...mow the yard, dishes, laundry, dust...well you get the jist of my day...all of the not so fun house chores...BUT after I am done I am going to go play in my stamp studio...I am looking forward to THAT!

Today's shares will be a little different. I didn't have much time this week to look around the galleries or do my company searches so I decided today to share some cool you tube videos that I have in my "favorites" with you, instead of cards today.

Today's videos are all created by Darlene Devries of DarleneDesign.com. She posts a new video on you tube about every Wednesday. I was searching around about creating with copics on you tube one day and came across this video she did. I loved the look of her card using copic markers on patterened paper. She uses Stampin Up! supplies but you could easily use any light colored scrapbook designer papers or stamps for this technique.


The second video I want to share with you is one about creating a card using multiple embossing powders. This card is really pretty! Not only does this video have a beautiful project...it also had a COOL TIP on how to create smaller frames with your layer dies. Doing this doubles the sizes of layers you can get out of your layer dies!!


I thought the idea of tracing the outside of your die and then cutting it out with your scissors was genius. You can get 2 sizes of layers for each die! This would work with many die brands too. Perfect for when you want just a very subtle layer.

This last video I will share with you really showcases the way Darlene colors with her copics. I really loved this method and thought that it is a great way for beginners to achieve the professional looking blends with copics. This card that she creates using a Hero Arts cupcakes set showcases this coloring style perfectly. Plus I love cupcakes :)


I hope you enjoyed today's shares. If you want to check out Darlene's other videos...and believe me she has a LOT of great ones... you can visit her you tube channel - darlene003

We will be starting to stock the copic markers at Loves Rubberstamps soon! YAY! I am excited for that! Hero Arts is also on our list of suppliers that we will be adding in the future too :)

Happy Stampin Everyone!
Laura

Pin It

Sunday, June 6, 2010

Pretty Tulips - Faux Metal Tin Ceiling

Afternoon stampers!

I wanted to share the 3rd card that we did at my faux metal technique class featuring Faux Metal Tin Ceiling. This is such an elegant background I absolutely LOVE it!

Here is the card:


Turned out really pretty I think! I drew my inspiration from a lady by the name of Diana Gibbs. She did a gorgeous card using this same technique and color scheme and even put together an awesome tutorial video on how to do this technique. If you want to see the tutorial that she put together click here:

FAUX METAL TIN CEILING

To make the background I used the Textured Impressions FINIAL PRESS embossing folder.

My vase and tulips were made using Stampin Up! punches. To create the vase take the ornament punch and punch out an ornament. Snip off the pointed end so it is flat. I embossed mine with the same embossing folder as the background for added texture. The tulips were made using the Stampin Up! Two-Step bird punch. You punch 3 of his wings in whatever color you want your tulips to be. Mine were done in crushed curry. You can sponge the edges of your flowers if you want also. Be sure to layer them so your two wing tips for the outside petals are both facing the outside, the middle one doesn't matter. glue them together. Then punch a stem of leaves from the same bird punch for your flower stems. I popped my tulip heads on dimensionals.

Here is the full list of products used:

Stamp Sets: None! All punches!

Paper: Stampin Up! Bashful Blue, Basic Black, Whisper White, Crushed Curry, Old Olive, Sahara Sand was used for my tin ceiling base

Ink: Stampin Up! Silver Embossing powder & Versamark

Accessories: Stampin Up! Textured Impressions Embossing Folder - FINIAL PRESS, Two-Step Bird Punch, Ornament punch, dimensionals, 2-way glue pen

I love how this card turned out! This is a beautiful technique and I hope you try one and put a link to your card in your comment.

Pin It