Showing posts with label 3D Projects. Show all posts

Sunday, March 8, 2015

Sensational Sunday Inspirations

Good Morning Stampers!

Welcome to the Loves Rubberstamps weekly Sensational Sunday Blog Hop! The Design Team has created some gorgeous projects for your Inspiration. Check out each link and leave a comment. If you get lost along the way, each stop will have a full list of links. One of the Design Team posts is the hop's Sensational Sunday Sweet Spot and a name will be drawn from that list of comments to be in a monthly drawing for a $20 Loves Rubberstamps Gift Voucher! We will draw the winner of the Voucher the 1st Sunday of each month from all the comments left on the design team blogs! Remember, you have until 8:00 pm CST Saturday to leave your comments!

I wanted to mention a situation that has been affecting our store and many retail establishments throughout the US. There has been an ongoing Labor Strike with the West Coast Port workers. This has shut down the ports and it is affecting how fast businesses are able to get their stock in. This has been going on for over 9 months. It is taking longer to get our preorders, restocks and merchandise in stock. The hardest thing is the suppliers try and give us dates to expect them, but with this situation they honestly can not say for sure. So many times the dates we are told keep changing. Please know that this is beyond our control and we will do our absolute best to try and keep you updated on the latest ship dates that we are given. I know it is frustrating to have to wait for fun new crafty goodies, I love getting my stuff as quickly as possible too! So please know that some of the shipping delays we have been experiencing is due to this situation and we just ask that you please be patient because this is something we have no control over. I am hoping they get things resolved very soon, so until then we really appreciate your patience!

I wanted to also say that I appreciate all the well wishes for the things I have been going through with my health. I had multiple tests ran in February, with some results we did not expect but the doctors have changed some of my medications to some stronger types with the hopes we can kick my UC back into remission. Until then I am having some good days and some not so good days, but am hanging in there! 

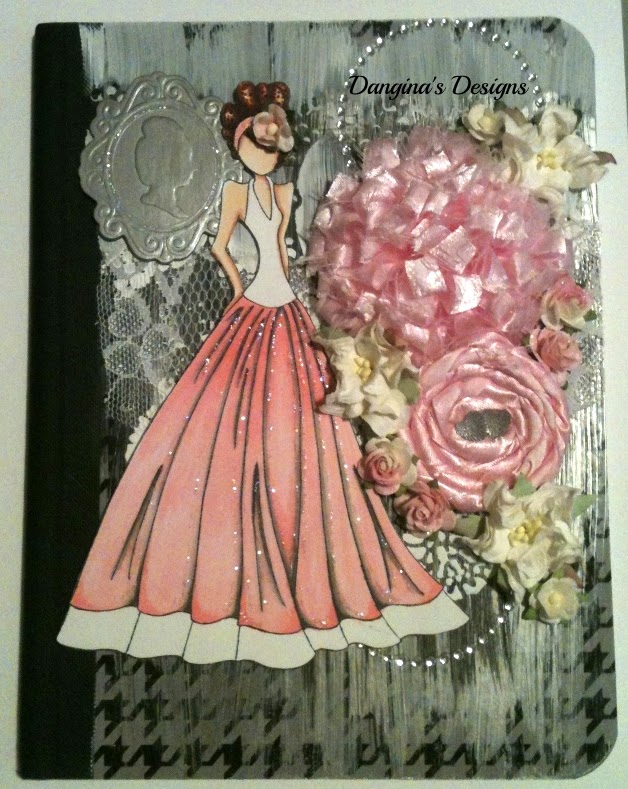
Now for the fun stuff!! I wanted to share a gorjuss project created by Marcy for one of our Loves Rubberstamps Challenges last year. Marcy is amazing at adding lots of fun girly stuff to her projects like, ribbons, lace, flowers, bling....she just does such a stunning job with this style. She created this gorgeous shadow box for her craft room wall...


I think this is so beautiful and how inspiring to see this stunner on your wall everyday when you go to get crafty! I love all the different trims, flowers and of course that Gorjuss Girl! We are expecting a lot of new Gorjuss Girls products the end of March and I am super excited for them to get here!!

Here is what Marcy used on her project:

Victoria Velvet - Tim Holtz Distress Ink
Black Tuxedo - Memento
Gorjuss stamp image called The Pretend Friend
"Anna Marie" Papers by Prima

Now let's hop along and see what the Design Team ladies have in store for you...

Laura - Loves Rubberstamps Blog - You are here...
Thanks for stopping by!
Laura!


Sunday, February 1, 2015

Sensational Sunday Inspirations

Good Morning Stampers!

Welcome to the Loves Rubberstamps weekly Sensational Sunday Blog Hop! The Design Team has created some gorgeous projects for your Inspiration. Check out each link and leave a comment. If you get lost along the way, each stop will have a full list of links. One of the Design Team posts is the hop's Sensational Sunday Sweet Spot and a name will be drawn from that list of comments to be in a monthly drawing for a $20 Loves Rubberstamps Gift Voucher! We will draw the winner of the Voucher the 1st Sunday of each month from all the comments left on the design team blogs! Remember, you have until 8:00 pm CST Saturday to leave your comments!

Hope you are all having a great weekend so far! I have a busy weekend planned of packing orders and trying to get through organizing, listing in the store and putting away of lots of new goodies that arrived this week :) My living room at the moment looks like a moving truck unloaded! One AWESOME and LONG AWAITED package from Taiwan arrived.... our Wild Orchid Crafts order we have been  W-A-I-T-I-N-G and W-A-I-T-I-N-G - Whoo hoo! I know the ladies waiting patiently for those will be super excited! You will want to keep checking the New Listings in the store...I have lots of new things coming :) 

This is a great weekend to not have to work...we are getting snow as I type this up. We are in the 8" of snow range that we are supposed to get tonight. So far we have gotten probably 5" at least. Then tomorrow the winds are supposed to start of course. It rained a TIN before the snow so there is a heavy layer of slush under the snow making it cruddy to drive. Good weekend for me to work on packing and going through stock :)

For today's project I wanted to share a blast from the past from one of our former Design Team Members... Athina! I have been searching and looking for loads of organizational ideas since I am starting to move into my craft studio and I came across this really cute file folder style organizer that she had made for her coupons. You could really adapt this awesome project for anything that you would like to keep track of. I would like to make one for my craft room projects. It would be a great place to store lists, ideas, and "to do" lists! 


Athina had created this project for our "Resolutions" Challenge and her resolution was to get more organized. I love it and like I mentioned you could make and use these for so many things!

Here are the items Athina used on her project:


And here is a close up of Athina's awesome coloring skills...


Now let's hop along and see what the Design Team ladies have in store for you...

Laura - Loves Rubberstamps Blog - You are here...
Thanks for stopping by!
Laura!


Sunday, November 23, 2014

Sensational Sunday Inspirations Blog Hop

Good Morning Stampers!

Welcome to the Loves Rubberstamps weekly Sensational Sunday Blog Hop! The Design Team has created some gorgeous projects for your Inspiration. Check out each link and leave a comment. If you get lost along the way, each stop will have a full list of links. One of the Design Team posts is the hop's Sensational Sunday Sweet Spot and a name will be drawn from that list of comments to be in a monthly drawing for a $20 Loves Rubberstamps Gift Voucher! We will draw the winner of the Voucher the 1st Sunday of each month from all the comments left on the design team blogs! Remember, you have until 8:00 pm CST Saturday to leave your comments!

We have been busy trying to narrow our choices for the new Design Team Members for our next term this last week! It has been tough! We have two members confirmed and waiting on our third! We hope to have an announcement soon :)

I thought today I would share a project that is a way throw back from one of our challenge in February of 2013! This gorgeous treat box was designed by Dangina Martinez using the Whimsy Wee Stamps Silver Fairy and a Shape EZ by TLC Heart Shaped Box Template.


How beautiful and this is one of my favorite stamps!

Here is what Dangina used on her project:


Now let's hop along and see what the Design Team ladies have in store for you...

Thanks for stopping by!
Laura!

Wednesday, August 6, 2014

WOW Wednesday - Featuring Dangina

Hi Stampers -

Hope you are having a great week so far! My week has been long and I will be ready for a few days off when they get here - even though they always go by so fast :)

Today I would like to share a few of  Dangina's gorgeous gorgeous gorgeous...did I mention GORGEOUS?? Altered Notebooks and Album that she has created using the Prima Dolls. I know I am kind of on a Prima Doll kick because I love these stamps but I find them intimidating a little because of their large size so I LOVE looking at how people use them - LOL!

Now Dangina has also created quite a few stunning tags using these dolls as well but I will save them for a later feature otherwise this post would be ginormous because they are all so pretty! :)

Here we go...


This is a jaw-dropping 12x12 inch scrapbook album that Dangina created using the Doll with Bolero Sweater stamp! I love the color scheme and all of those beautiful zig-zag flowers that Dangina created! Couldn't you just stare at this for hours?!?! I know I could! I also love all the different textures, layers and bling! Such a beautiful family heirloom!

Dangina also did a few different Altered Composition Books as well. These are all amazing! Such a neat idea to create notebooks you would be proud to show off and use! These would make stunning gifts too! This beautiful black and white themed notebook was created using the Doll With Swing Dress stamp. 


This altered composition book was created using the Lorrena Prima Doll Stamp. She has a wide, full dress and I love how Dangina added the bling to the folds of her dress! The ribbon flowers on this are so beautiful also!


I love the neutral color palette that Dangina used with this journal! Check out the background too! I love the mix of the brick patterns with the distressed dots - looks amazing! The paper pieced outfit on the Doll With Bolero Sweater stamp goes perfectly with the background! The flowers add such elegance to this! Love it!


Every time I saw a new Altered Notebook that Dangina did I swore it was my new favorite and then she would make a new one that I loved just as much - LOL! I love the purple and white color scheme on this one. The zebra stripes on the dress give it the mix of a little wild with the girly-ness of the flowers and bling! This one would totally be my style :) This Prima Doll is called Doll With Pocket Dress.

This is another adorable altered notebook featuring the Doll With Ruffle Dress stamp from Prima. I really love the neutral colors on this one and using two different patterns of paper to paper piece the dress! The embellishments really look gorgeous and I bet the gold embossing really looked amazing in person! 


And the last one uses the Doll With Swing Dress Stamp. I love this one! The pinks pop off the background and I love all the sentiments, and that camera is so cute! LOVE LOVE LOVE it!

Well...I hope you enjoyed Dangina's Altered Notebooks and Prima Album! I really love the variety of colors, styles and themes of the different notebooks! Some AMAZING and STUNNING WORK!

I have listed the newest release prima dolls last week in the store so be sure to check those out and I will be listing some of the new release prima collections for preorder as well over the next few days :)

Check out more of Dangina's work on her blog: My Carden

Thanks for stopping by today!
Laura

Wednesday, July 30, 2014

WOW Wednesday - Featuring Marcy

Good Morning Stampers!

I feel like I haven't wrote a "real" blog post in a long time! I haven't had as much crafty time...well that is a total understatement...I have had NO crafty time since the beginning of April with all the personal things we went through and trying to keep things together and running. Now that things are more back to normal and I can try and get on a routine I am hoping to remedy my no crafting slump this week so wish me luck! LOL!

One thing that I thought would be fun to do is have a "WOW WEDNESDAY" each week. Our design team is so phenomenally talented and I am always so grateful for all the ladies on our team and the ones that have been with us and moved on, I just can't even tell you. These ladies put in a lot of hard work and I could literally spend hours just going back through all of the team designs and oooohing and ahhhhing - LOL! Sooooo I thought that if I loved seeing the "Blasts from the Pasts" from our Design team ladies, then you might as well!

Each Wednesday I am going to share a few favorite projects that one of our design team ladies have created with you. It could be from one of our current design team members or a past member, might be one project or a few...but they will always blow your socks off :)  I think it will be a fun feature and I hope you all enjoy seeing these past stunners as well!

Today's projects were all designed by the mega talented Marcy Dangcil. I call Marcy our Queen of Girlie Projects because she always does the most beautiful projects filled with lots of bling, pearls, lace, flowers, and all those pretty things us girls love :) I have recently added the newest release from the Prima Mixed Media Doll Collection by Julie Nutting to the store and so I thought it would be fun to check out some of the gorgeous tags and mixed media canvas projects that Marcy created using these fun Prima Doll Stamps!


This gorgeous tag was created for our Anything Goes Challenge #102 using the Prima Doll With Strapless Dress stamp.


This beautiful tag was created using the Doll With Ruffle Dress stamp for our Anything Goes Challenge #64. I LOVE how Marcy added the little rose trim to the dress and one for her hair!


How gorgeous and girly is this tag?!?!? I love the lace trim and flower bead trim on the dress, the lace bow, all the gorgeous flowers....everything - LOL! This is the Riley Doll stamp and Marcy also used the Wings stamp set that is created to use with these dolls as well. Marcy created this gorgeous tag for our Anything Goes Challenge #81. She has some close up pictures on her blog post here if you want to check those out!


I really love the colors in this tag and her paper pieced dress is so pretty! This gorgeous tag was created using the Doll With Peasant Dress stamp for our Anything Goes Challenge #72!

And.... last but not least.... this breath taking Mixed Media Canvas using the Prima Doll With Swing Dress!


Wouldn't this look amazing hanging on your wall or displayed on a shelf? I LOVE the sequin trim dress - how GENIUS! Such a stunning project!

I hope you enjoyed checking out Marcy's stunning Prima Doll projects with me today and i hope you were WOW'ed! :)

Thanks for stopping by!
Laura

Thursday, March 27, 2014

Little Trumpety Baby Box Inspiration


It is a new Thursday this week. That means it is time for some Shanna Inspiration.

I got to use my Portrait again for this fun baby box I created. I love cutting 3d objects with this. It is so much easier then having to do everything by hand and trust me... I may have a Math degree but honestly, I am not architect! Maybe I should have went to school for that! It would really come in handy now!


I colored this image with copics. I love the way I colored him too. I was trying a vintage technique of coloring. I would like to call it a European style honestly. So many over in Sweden and the UK and other parts of Europe color with the beautiful and soft technique using Distress Inks. I am not so brave to try the watercoloring. I have been dying too but just don't have the time to sit and really try!


Here you can see how deep the box is. You can fit quite a bit in here. 


Items Used:
Magnolia Stamps - Little Trumpety with Bow (Lost and Found Collection Coming Soon)
Magnolia Doo Hickey - Star Tag

Wednesday, February 19, 2014

Crafty Sentiments Designs - SNEAK PEEK!

Hi Stampers!


Today I have a cute SNEAK PEEK for you at one of the new release stamps coming from Crafty Sentiments Designs!

This cutie is called Prom Dress and she will be available for purchase on Feb. 22nd:


I decided to try one of the projects that has been on my "MUST TRY SOMEDAY" list and that is a Faux Book Card or Book Shadow Box, whichever you want to call it! I am pretty happy how it turned out...here are some other pictures to show the different sides...


                                    If you want to create a Faux Book here are the instructions:

Cut the cardstock for your cover at 5 1/4" x 9 1/2" and then score it at 4 1/4" and 5 1/4"
The Designer Paper for the cover is cut at 4" x 5" 
The Designer Paper for the Spine and inside spine is cut at 3/4" x 5"

To create your book pages you will need to cut:
2 cardstock pieces that measure 4" x 10"
2 cardstock pieces that measure 5" x 10"

You are going to score all four of these every 1/2" to the very end.
To create the book pages - take each piece and accordion fold these back and forth - be sure
to use your bone folder between each fold to get nice, crisp folds.
After you have the piece all folded - sponge the edges with ink if you wish.

Then take one long piece and one short piece and "marry" them so they make a right angle, 
sliding them together so the pages alternate. Glue the outside flaps to hold the pages in place.
Add the other long and short end to create your book pages, gluing each outside flap together
until you have a full rectangle. 

Place your decorated insert onto the inside back cover and then glue your book pages over it.
To create the decorated top of the pages, just cut strips of cardstock and punch one edge.
Glue down on top of the book pages, miter the corners of the two top strips in you wish.

Then just decorate as you want!


Thanks for stopping by today! Be sure to visit the INSPIRATION BLOG and see MORE Sneak Peeks from the other Design Team Members! 

Laura

I will be entering this in the following challenges:

Papertake Weekly - Lovely Layers
Craftin Dessert Divas - Linky Party 25 Glitter
Crafting From The Heart - Anything Goes Use Flowers
Craft Your Passion Challenges - Girly Girl
Creatalicious Challeges - Pearls & Glitter
CMC Copic Challenge - Anything Goes
Delicicious Doodles - Ribbon & Bling
Wags N Whiskers - BINGO - Line Glitter, Ribbon, Red

Thursday, January 23, 2014

Shanna's Inspiration with a Heart Box


Today is a new day for 


I am beyond excited to share with you today this project because....

I got to use my new Portrait for the first time!!! Yeah this girl did her first cut and made a heart box!

Tuesday, January 7, 2014

Ready to POP!

Hi Stampers!

This week I was able to combine my Design Team Projects for Crafty Sentiments Designs, The Cutting Cafe AND our Loves Rubberstamps Challenge this week!

This week starts the new Design Team Term for The Cutting Cafe so we could chose any file we wished to work with. My niece, Trista, is expecting her first baby in May so I thought I would would use the cute Popcorn Box Template to create some treat holders for her baby shower.


I really loved this file because the popcorn boxes are all colored already along with many of the sentiments so all you have to do is print them, cut them out, assemble and decorate! So easy! You can choose from a pretty pastel blue for a boy, pink like I used or there is also a multi-colored pastel and a standard red one too! These would be cute for Easter Treats with the pretty pastels :)

I decorated the front of my Popcorn Box with one of my FAVORITE images from Crafty Sentiments Designs called Welcome Little One. This is such a beautiful image and so fun to color! I colored her with copics and then covered her dress with stickles. After it was dry I fussy cut her out and popped her on my box front with dimensionals.

After placing my image, I just added some  bling, my favorite rose trim that goes all the way around the box, and added the sentiment which comes in the popcorn file, then a few pieces of "popcorn" that is part of the set as well. After I cut the popcorn pieces out I sponged them with a little bit of yellow for the butter :) You can't have popcorn without butter!

This week at Crafty Sentiments Designs the challenge theme is Anything New. You could do New Year, New Baby - which is what I chose, New Home, Use your New Stash...loads of options!

Our Loves Rubberstamps Challenge is an easy one this week too...Anything Goes AND we are sponsored by The Cutting Cafe this week which makes it even better :)

Here is a closer look at my image...


Be sure to visit The Cutting Cafe Inspirational Blog on Wednesday afternoon to see what files the other Design Team Members chose. I love Free Choice Weeks because it is always neat to see what everyone chooses :)

We hope you will play along in our challenges at Crafty Sentiments Designs - Anything New and Loves Rubberstamps - Anything Goes....there are awesome prizes up for grabs at ALL THREE PLACES :)

Thanks for stopping by today! 
Laura

Project Recipe
Rose Trim, Pretty In Pink, & Daffodil Delight Inks from Stampin Up!
Stickles

Skin - Spectrum Noir FS1, Copic E00, E11, E21, R20
Hair - E31, E33, E25
Dress - RV000, RV52

I will be entering this in the following challenges:

A Gem of a Challenge - Something New - Jan 17th
Crafty Calendar Challenges - Let's Celebrate - Jan 31st
Digi Designs Challenge - Celebrations - Jan 17th
A Creative Romance - Something New - Jan 16th
Chocolate, Coffee, & Cards - New Beginnings - Jan 9th
Jellypark Challenges - New Beginnings - Jan 16th
Left of Center - New Beginnings - Jan 17th
Stempelsonne Challenges - Anything Goes - Jan 9th
Totally Papercrafts - Challenge 200 New Beginnings - Jan 9th
C.R.A.F.T Challenge - Anything Goes - Jan 8th
Crafty Little Fairies - Starting Over - Jan 8th
MilkCoffee Challenge - Celebrations - Jan 15th
Crafting By Designs - Almost Month Challenge Anything Goes - Jan 25th
Creative Moments - Anything Goes - Jan 14th
Inky Impressions Challenge - Anything Goes - Jan 8th
Simon Says Stamps - Wednesday Challenge Something New - Jan 8th
Sparkles Monthly Challenge - Anything But a Card - Jan 15th
A Little Bit Crafty - Celebrate -  Jan 29th
Heck of a Challenge - New - Jan 31st
Mema's Challenges - Jan. Bingo - Jan 31st - Line - Rubber Stamp, Punches/Dies, Free & Pearls/Bling
Natalie & Amy - One For The Girlies - Jan 31st
One Crazy Stamper - Anything Goes - Jan 31st
Really Reasonable Ribbon - Pink & Ribbon - Jan 12th
Creative Card Crew - Anything Goes - Jan 12th
Creative Craft Challenges - Anything Goes - Jan 12th

Saturday, December 7, 2013

VIDEO TUTORIAL - Creating a Coordinating A2 Envelope & Liner

Hi Stampers!

I hope you are staying warm where you are this weekend...Right now the windchills are -18 below zero here....BRRRR. These are the days I wish I could just stay home in my warm fuzzy jammies all day, snuggling under my blanket and drinking coffee - LOL!

Today we have a super cute project from Indah using a Limited Edition Bean image from The Greeting Farm called Hatter Bean.


I think that Indah's coloring is gorgeous on this cutie! In Indah's Video Tutorial today she will be showing you how to create a matching A2 size envelope to coordinate with your card, and how to do an envelope liner!

Check it out...


Thanks for stopping by today and I hope you stay warm :)

Laura

Wednesday, December 4, 2013

Christmas Stocking Box

Hi Stampers -

This week for my Design Team Project for The Cutting Cafe...we got to choose from a few different boxes that are perfect for giving as Christmas Gifts. We could chose from The Stocking Box, which is the one I chose, The Christmas Shape Milk Cartons, the Candy Cane Box Set, or the new Christmas Bag Toppers Set.


I used some of my most favorite Designer Papers from my hoard. These are from an old Stampin Up! set. I let the papers do the decorating for me, the top cuff is the design of the paper that I just traced for the cuff and then cut the flowers out so it looked like they spilled over. I cut another flower out and then popped it up with the tag. The sentiment is one that comes with the Stocking Box Set.

The stocking I made is the Large Size and I plan on placing some candy canes and a gift card wrapped in some tissue paper inside of it for one of our white elephant Christmas Gifts this year. Then I won't have to wrap it :) There is a small stacking that also comes in this set of templates.


This is the side of the box, I just used some more of the paper from this set.

Thanks for stopping by! Be sure to go check out The Cutting Cafe Inspiration Blog to see what my fellow teamies chose to create this week :)

Laura


Wednesday, November 27, 2013

Thanks My Crafty Friends...

Hi Stampers!

I am back with my combination - The Cutting Cafe and Loves Rubberstamps Design Team Project :)
If you are looking for my Crafty Sentiments Designs Project just scroll down :)

This week for The Cutting Cafe we could chose Any File we wanted to work with. I decided to use one that I have had for awhile but had not had a chance to use yet :) I chose the Copic Marker Box. 

This week for our Loves Rubberstamps Challenge it is all about giving Thanks. You can make a Thank You Project for someone special, or make it Thanksgiving themed. I chose to create a matching Thank You Card for my Copic Marker Gift Box :)

Here is the set together:


This week for the Loves Rubberstamps Challenge we are being sponsored by Saturated Canary so the entire Design Team used Krista's adorable images :)

Here is a close up of just my Copic Marker Gift Box:


Here is a close up of my card:


The Sentiment on my card and on the Copic Marker Box both come with the Copic Marker Box Template.

Here is a close up of my flowers. The Cream colored one was created using the My favorite Things Die-Namics Rolled Rose Die. My Branch punchies are created using the Martha Stewart Branch Punch.


Here is a close up of the Saturated Canary Image - Sketchie! LOVE her :) I colored her with copic markers. I added some Frantage and sponged the edges with Old Paper and Walnut Stain Distress Inks using my Ink Blending Tool. 


The Designer Papers that I used on both projects is the Winter Wishes Collection from Bo Bunny. 

I also used this card sketch from Crafting Life's Pieces for my layout on the card:


This is their last card sketch challenge :( 

Thanks for stopping by again today :) Be sure to play along in our Loves Rubberstamps Challenge this week! 

Also go check out The Cutting Cafe Inspiration Blog to see what files my fellow teamies chose to use this week :)

I hope that you all have a safe Thanksgiving tomorrow and enjoy spending time with family! Eat lots and lots :D

Laura

I will be entering this in the following challenges:

Crafting Life's Pieces - Sketch #64
Saturated Canary Challenges - Distressing