Showing posts with label Seasons - Spring. Show all posts

Sunday, April 7, 2013

Sensational Sunday Inspirations Blog Hop & CANDY!

Hi Stampers!

We hope that you had fun playing along in our blog hop this last week! The Design team and I all thought it was a blast and the feedback that we did get was really positive so we are going to have this be our new format for the Sunday postings :)

Before we get to today's hop... we have to announce last week's candy winner!

This week the Sensational Sunday Sweet Spot was on Shanna's Blog!!

Here are your random numbers:

5

Timestamp: 2013-04-07 04:29:45 UTC

Comment #5 (design team members comments were not counted) - kren - A Fourth Life who said: Oooohhhhhh, so cute! TFS!

Congratulations Kren!! Please send me an email at lovesrubberstamps@yahoo.com by April 13th and I will send you your code for a $10.00 gift voucher to the Loves Rubberstamps store!

Now... Let's go to the Hop!

Welcome to the Loves Rubberstamps weekly Sensational Sunday Blog Hop! The Design Team has created some gorgeous projects for your Inspiration. Check out each link and leave a comment. If you get lost along the way, each stop will have a full list of links. One of the Design Team posts is the hop's Sensational Sunday Sweet Spot and a name will be drawn from that list of comments to win a $10 Loves Rubberstamps store gift certificate. So, all you have to do is hop along and see all the creations and leave a little love for the Designers! You have until Saturday, April 13th, at 8pm CST. Have fun and we hope that you enjoy the hop!

For my card today I decided to use one of my Magnolia stamps that I love for Spring and Summer cards. This is the Tilda As a Butterfly stamp from the Chasing Dreams Collection. We don't have this series listed in the store yet but it will be coming soon :) I will be listing the brand new Once Upon a Time Collection in our store later today though! YAY! Here is my card for today...


I colored her with my copics. I am still a newbie at coloring pleats in clothes and after my markers dried I think it looked better than it did originally - LOL! So if you are trying new things with your copics, give the ink a chance to dry and you might like it better :) I am not quite sure about the yellow...I only have 3 colors and they are a little bright to me. So while the yellow is growing on me... I will just consider it like a little burst of sunshine in my Spring themed card  :)  The fancy corner embellishments are created using the La La Land Die - Filigree Corner Die.

Here are some close ups of my embellishments on the front...


My Metal Butterfly Charm

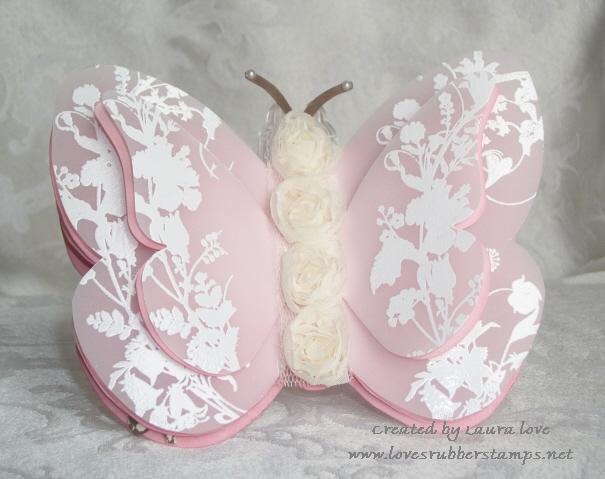
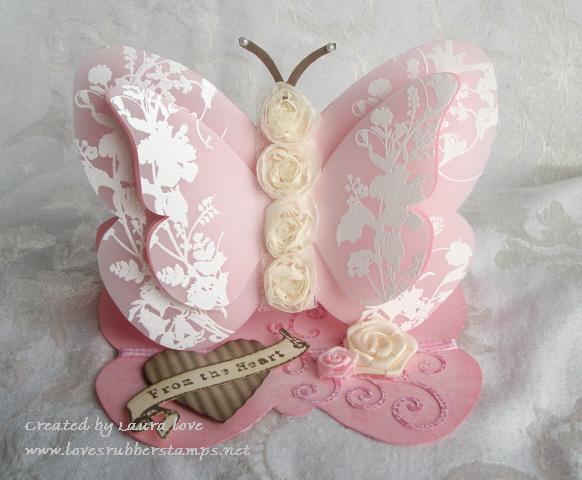
I decided to make this an easel style card. Instead of creating a one piece card front, I decorated the front with two seperate panels so when you fold it you still see part of the front with the designer paper and then the Spellbinders Floral Oval piece becomes the main centerpiece.


Here is a closer peek at the inside sentiment area...


I created the tag using the Spellbinders Fancy Tags Dies and the sentiment is from the new Delicate Words Die from The Greeting Farm. Love this! Those beautiful papers are from the Bildmalarna Flowers of Spring 12x12 paper. I also used some prima flowers that we will have in the store soon as well!

I hope you liked my card for today ...

Now I won't keep you any longer! Your next stop on the hop is the super talented...Dangina!  

Just in case you get lost along the way...  

Dangina
Athina
Shanna
Lydia
Marcy
Ivonne

Have a great day all!
Laura
Pin It

I will be entering this in the following challenges:

Magnolia-Licious - All About Spring
Midweek Magnolia - #55 How Charming - Have Charms on your Project
Marvelous Magnolia Challenge - #21 Anything Goes
Tilda's Town - #47 - Fussy & Fancy or Understated Elegance
Lovely Hanglar or Sweet Magnolia Challenge - #66 Butterflies or Things That Flutter
Magnolia Down Under - Tic Tac Toe - Line - Metal, Sentiment & Lace
Dilly Beans - Spring!
Little Claire's - March Challenge Cards with Folds
Stamp & Create - April Challenge - Use at least 1 die cut

Thursday, April 4, 2013

Signs of Spring

Hi Stampers!

Well, my Step-Dad is doing pretty good today! The antibiotics seem to be working so far so that is good news. He will have to stay in the hospital at least another day or two and then he will continue antibiotics and will be off work for a few months. Hopefully he continues to get better and has no set backs :)

Today we get to see some Inspiration from Ceal! She has a beautiful clean and simple design for you today!


Isn't this like a breath of fresh, Spring air? Ceal used the beautiful Flourishes stamp set Signs of Spring and Tag Lines. She colored the stem with her copic sketch markers and then paper pieced the flower head. She used the Tulip frame embossing folder from Stampin Up! to frame her piece in. This makes a simple, yet beautiful thank you card when you would need something quick!

Well...I will be back in just a few minutes with a bonus post for you today... :)

Pin It

Tuesday, April 2, 2013

Faith & Trust & Pixie Dust

Hi Stampers!

Today starts a new Loves Rubberstamps challenge! This one is everyone's FAVORITE... Anything Goes! Before I share my project that I created for inspiration... I wanted to share a picture of my Grandma :) For those not aware, she is battling breast cancer for the second time and just had a masectomy at the beginning of March. Last week, I received a surprise in the mail from one of our Design Team members, Athina Emory, of a lovely card for myself, and also one addressed to Gramma and for only her to open it :) Grandma was super touched by the lovely card and she wished for me to tell Athina - thank you so much from the bottom of her heart. She loved the card and thought it was such a wonderful surprise. This is for you Athina :)


For my project today I am trying to use some of my stamps that I have not had the chance to ink up yet. I totally adore C.C. Designs stamps and I saw that their challenge this week is to use an image with wings so I decided to play with Pixie Lucy. This is one of my super favorite stamps and it is horrible that I have had her for so long and never had the chance to color her up yet!


I decided to try and go with some bright, bold, spring-like colors because I am getting tired of cold and snow - LOL! The mushroom image is one from my very first purchase of Magnolia stamps when I bought the Alva and Alf elves collection. This is one of the accessory stamps for the characters to sit on. I colored my Pixie Lucy using copic markers. Her hair and skin colors are all from the 6 piece copic sketch marker set. I don't own very many copics yet so the grays in my mushroom are spectrum noir markers and the cap is actually all the colors from the Color Fusion 2 Trio. The flowers are a mix of handmade rolled flowers and prima flowers. Using so many flowers on a card is a new thing for me too - LOL! I always admire the cards with loads of gorgeous flowers arranged so perfectly. I think I need one more prima flower next to my two rolled ones on the bottom :)

Here is a little closer look at my Pixie Lucy and mushroom together:


And here is a closer look at Pixie Lucy so you can actually see the Dazzling Diamonds on her wings...


I also am super lame when it comes to trying to come up with a lay out for my cards so I looked around and saw this card sketch from Card Mania for their challenge this week and decided to use it for my lay out :)


I hope you enjoyed my project today and please come play along in our challenge this week! Our design Team and myself would love to visit your blog and see your creations :)

Happy Stampin!
Laura

Pin It
Here is the list of products I used on my card:

C.C. Designs - Swiss Pixies Collection - Pixie Lucy
Magnolia - Mushroom
Spellbinders - Floral Ovals
Prima Flowers - Sherwood Rose Larkspur (will be listed soon- in stock)
Prima Flowers - Avon Rose - Pixie Glen (will be listed soon - in stock)

I will also be entering this in the following challenges:

All That Scraps - Winged Things
Bunny Zoe's Challenges - March Challenge Girly
613 Avenue Create - #13 Anything Goes with Flowers
Challenges 4 Everybody - #17 Anything Goes
Glitter 'N Sparkle Challenge - #26 Cute
Robyn's Fetish - #153 Fairies
Pile It On - #13 Handmade Flowers
2 Sisters Challenge Blog - #137 Sparkle N Shine
Color Me Creative - All About Hair
A Gem of a Challenge - #73 Make it Cute
Sweet Stampin' - Oh So Girly
Chocolate, Coffee & Cards - Bring On Spring
Brown Sugar - #35 Flowers
Crafts 4 Eternity Recipe Challenge - #117 Cute As You Like
My Heart Pieces - Fairies or Angels
Forever Friends Fortnightly Challenge - #58 Girls
Marker POP - #20 Anything Goes
My Craft Creations - For the Girls
Stamp With Fun - #205 Spring
Whoopsi Daisy Challenges - Bling
Corrosive Challenges - #171 Spring Fling


Tuesday, March 26, 2013

Developing Polaroid


Hi Stampers!

Today is a new Loves Rubberstamps challenge with an Easter theme! I decided to use my Design Team Project for The Cutting Cafe as my Inspiration piece because I LOVE how it turned out and thought it was pretty cool! PLUS ... I just couldn't wait another day to share :D

This week at The Cutting Cafe we had our choice of using either the Camera Photo Shaped Holder Template or we could choose one of Regina's new release files called Polaroid and Camera Fun Template and Printable Stamp Set which is the one that I used.

I had come across a fun technique awhile ago that makes your stamped Polaroids look like they are developing! As soon as I saw the Polaroid frames in the new file I knew I had to finally try it out!

Here is the front that shows the three Polaroids in each of their developing stage...


Isn't that AWESOME? The first Polaroid is the brownish, black one like you just snapped it and it starts the developing phase. The second one you can just start to see the image but it still has the brownish hues. The 3rd one shows the photo fully developed!

Here are close ups of the Polaroids so you can see each one a little better...


I have never made a card this size before - it is 9" x 4" and is the perfect size for mailing in a business size envelope! I also decorated the inside of my card for the 1st time - LOL! I love the look of having the insides finished too, but I never seem to get that part done! Here is what my inside looks like...


Here is a close up of my little Easter Tilda in her paper pieced outfit:


I hope you enjoyed this card today! Be sure to head over to The Cutting Cafe and pick up these awesome files - you will have so much fun using them! Also be sure to check the Inspiration Blog on Wednesday to see all of the projects that the Design Team created! It is always so fun to see everyone's creations that are so different using the same files!

Also be sure to play along in our Loves Rubberstamps Challenge this week...I know you are busy busy busy making your Easter projects so come show us what you are making :)

Thanks for stopping by!
Happy Stampin'!
Laura

Pin It

Here are the products I used on my card:

Spellbinders Scallop Ovals Dies

I will be entering this in the following challenges:

Cutie Pie Challenge - #40 Easter
Incy Wincy - Use Pastels
Lovely Hanglar or Sweet Magnolia - #65 Stitching
Magnolia Down Under - #189 Easter Greetings
Sentimental Sundays - #147 Stitching
Color Me Creative Challenge - #64 Spring Colors
Sweet Stampin' - Lots of Layers
Card Makin' Mommas - Spring Colors
Chocolate, Coffee & Cards - Bring on Spring
Stamp and Create with Magnolia - #5 Spring With New Life
Tilda's Town - #45 Think Spring
Totally Papercrafts - #159 Easter Eggstravaganza
Cute Card Thursday - #161 - Easter Parade
Marvelous Magnolia - Dies
The Squirrel & The Fox - #40 Easter
Magnolia-Licious & Wee Stamps Challenge - All About Spring


Tuesday, February 26, 2013

Easter Eggs For Sale!

Hi Stampers!

Today is a new Loves Rubberstamps Challenge and the theme this week is to create a tag or have a tag somewhere on your project. Well, I also serve on the Design Team for The Cutting Cafe and this week we had a super fun assignment of using Regina's new Little Red Wagon Template. I had a super cute project in mind that creates a little scene with a separate project for each but that are designed to go together...LOL... make sense?

So my post today will be a merge of my Design Team Post for The Cutting Cafe and some details about how I created my project for the Loves Rubberstamps Challenge.

First I will show you a picture of the whole sha-bang...so you can see what I am talking about...


Here is the set together... I created the little Easter Wagon using the Little Red Wagon Template for my project this week for The Cutting Cafe, and the fun Spring card with the homemade tag is for the Loves Rubberstamps challenge. Don't these look adorable together!

Let's start with the cute wagon!


Now...even though the name of this file is "Little Red Wagon" you can make your wagon any color you want - LOL! That is what makes it so much fun because you can change the colors for the seasons or occasions. I am thinking this would look super cute done up in fall colors with leaves and pumpkins in it...you know what I will be making come October :)  This file also comes with three sized boxes that you make and stack inside also, some fun embellishments, and sentiments for your little care packages! You totally need this file...I am telling you!

Because mine is a little Easter Wagon...what better to fill it with than some of my favorite Easter treats... Cadbury CARAMEL Eggs and those yummy, addicting, robins eggs! So good! I decided to make my wagon have wood slats because it's carrying eggs...so I used my new Die-Namics Barbed Wire Fence die from My Favorite Things. It even has the embossed wood details! I LOVE LOVE this die! The upward posts are the posts from the fence and the two strips are actually the strip of paper I had left over after cutting the fence posts out...perfect huh, and no wasted paper :) That cute little bunny is called Bunny Lucy from C.C. Designs! I love her :)

Here is a closer look at Miss Bunny Lucy...


I colored her hair and skin with copics, and then used spectrum noir alcohol ink markers on her outfit.

Now here is a look at my card with the tag all tucked in...


And the Tag Pulled Out...


The Bunny and the Eggs are from the C.C. Designs Spring Has Sprung Stamp Set and the Eggs Sentiment is from their Spring Logos Stamp Set. This bunny is soooo adorable! I colored everything on this with Spectrum Noir Markers except for his little cheeks, that is the copic color R20. I liquid appliqued his tail for "fluff" and added bling to the flower centers and white gel pen designs to the eggs.

Do you notice something new?? YEP... I tried sewing on my card for the FIRST TIME!! EEEKKK! I threaded the machine on my first try too!! Do you notice what is missing? YEP! No fingers attached! I didn't accidentally sew one to my card - LOL!

Just don't look at the bottom right corner because that was where in the instructions it said when you were done to go in reverse to "seal" it or something like that but I am sure I did it wrong because it is blobby. I decided for my first time sewing to use a zig zag stitch so it was harder to tell if I went straight or not - LOL! All in all I am really proud of my first "sewn" card - and I think my blobby corner just adds to the country charm ;)

I do need to study some YouTube videos of how to turn corners and how to stop when your finished but it will be fun to try and learn because I love the look of the sewn cards.

Here is a final look at my two cuties together so you can see the little bunny closer too...


Thanks for stopping by today! Be sure to play along with us this week in our Loves Rubberstamps Challenge.... AND... Be sure to stop by The Cutting Cafe and purchase the Little Red Wagon Template for yourself! You will seriously love it!

Tomorrow afternoon at The Cutting Cafe's Blog you will get to see what the rest of the Design Team members did with their Little Red Wagons! I can't wait to see them because there is literally so many things you can use it for and decorate it with! It will be a blast!

Have a great day all!
Laura

Pin It

I will be entering this is the following challenges:

C.C. Designs - Anything Goes
Bearly-Mine Challenges - Anything Goes
Created With Love - Bright & Cheery
The Cutie Pie Challenge - Pretty Pastels
Incy Wincy - Anything But a Card
Stamp and Create - Spring is Coming
Totally Papercrafts - Hope for Spring
Dutch Dare Card Challenges - Tag You're It
Sassy Studio Designs - Use Stitching Real or Faux
Top Tip Tuesday - Tag Your It

Saturday, February 23, 2013

Victorian Bunnies

Hi Stampers!

Hope you are having a great Saturday! I have a busy day planned of trying to get taxes finished up to take to the accountant. This is the non-fun part of the business side so I have been dragging my feet about it - LOL! But it has to get done! I am starting to get distracted though because I just had my "AHA" I know exactly what I want to do for my next project come into my brain and now I can't focus because I want to go make it before I forget what my plan was - LOL! I may have to take a creative break just so I can re-focus on work later :) Do you ever do that? Funny how sometimes you can go all week and not have one good idea and you struggle with mojo and then sometimes it is just WHAM - pops into your brain and you can't think of anything else. LOL!

I also just got a new Janome Sew Mini to attempt to sew on my cards. The farthest I have gotten with it is taking it out of the box and putting it on the table. I have been staring at it for a week now. I have to figure out all the technical things of trying to thread bobbins and figuring out how to thread it, get tensions right, and not sewing any body parts to my paper. I am thinking maybe it wasn't such a brilliant idea - LOL! I have never sewn or used a sewing machine before so it is like Greek to me and they freak me out a little - LOL! I am sure once I get over my little morbid fear of sewing my finger to my project I will be fine. But any pointers from those of you that sew would be great! Even better if you have one of these little machines yourself and can tell me how you set it up for sewing on your projects would be super awesome :)

Today being Saturday we have an inspirational piece from Jacqueline Smith! She has created a lovely Easter project to share with you!


She used the image called Victorian Bunnies from Magenta Stamps. She stamped this on acetate with black stazon ink and then covered the back with glitter and then colored that with Tim Holtz Alcohol Inks. How cool! Those bunnies are probably super sparkly and pretty in person! I took Jacqueline's picture and made it large and just cropped the bunnies so you could see this technique closer...


This helps you see all the glitter a little bit better! I bet it looks amazing in person! I also love that she paired this was the soft pastel blues and browns! Makes a really pretty Easter card!

Well... I better get back to work...or maybe I will go play in my stamp room for awhile and let my brain have a mental break from work for a bit :)

Hope you get some crafty time in today! Thanks for stopping by!

Laura

Pin It

Wednesday, January 30, 2013

Ready for Spring!

Hi Stampers!

We are having quite the windy, snowy, blowy, yucky day here in Iowa! I had to work the overnight shift and this is how my drive home looked at 7:30 this morning....


We had white out conditions and you could only see one line ahead of your car. Luckily, once you were out in the open country it was blowing so hard it wasn't really sticking to the roads so the pavement was mostly clear. There were a few nasty spots still. In town and the east/west roads were awful...totally snow, tire ruts, ice and slush covered! Your car would get pulled and slid everywhere when you were trying to drive. That part wasn't fun! And before you ask...I was stopped when I took this picture with my phone :)

The winds are supposed to stay blowing around 40 mph all day whipping this snow around! Yuck! Good thing it is my bedtime so I don't have to be out in it... at least until I tredge to work tonight - LOL!

Anyway...my card today is much prettier to look at and reminds of a beautiful Spring or Summer day which I am totally ready for - LOL!

This week at The Cutting Cafe we could choose from  four different files - Onesie Shaped Card, Overalls Shaped CardAssorted Crown Shaped Cards or The Butterfly Shaped Card. It was a tough decision this week because these are all such adorable files! I decided to use the Butterfly shaped card and made my Grandma's Birthday card. She was 75 Monday! She is currently battling breast cancer for the second time and will be having to have a masectomy. So I wanted to make her something a little extra special.

Here is my card closed...


I used the Butterfly Shaped Card for my base and then I used the Butterfly - Beautiful Wings Die from Stampin Up! to create a smaller set of wings so I could have a 3D layered butterfly. I did two layers for each size, one in pink pirouette and the other in vellum which I embossed in white with the Take Flight stamp set from Tim Holtz. I will be adding some Tim Holtz stamps to my store this week, including this stamp set :)

The extra special thing about this card is that I created it into an Easel card so Grandma could keep it on display and easily see that beautiful butterfly...


The inside roses hold the butterfly up so it makes it's own stand. I also added a corrugated heart and the banner and sentiment from the Tattered Angels Vintage Seasons Timeless Romance set. My flourish is the My Favorite Things Fancy Flourish Die-Namics. Grandma really loved it :)

I hope you enjoyed it also! Be sure to stop by The Cutting Cafe blog this afternoon and see what my fellow design team members have created! I am sure that as adorable as these files are...there will be a lot of amazing projects!

Thanks for stopping by!
Laura

Pin It

I will be entering this into the following challenges: