Sunday, December 12, 2010

Christmas Magic

This is my MOJO sketch challenge entry for this week. Every Monday they post a new sketch for you to try on their website here: Mojo Monday Here is this week's MOJO sketch #168 that I based my card on:


and here is my card:


This is one of 4 cards we made at my Christmas card stamp-a-sack tonight too! I think it turned out really pretty! I am loving the cherry cobbler mixed with the various browns this year for Christmas! It is hard to tell from my photo but I embossed the tops of the hills and the evergreen with iridescent ice so it has some sparkle!

Here is what I used:

Stampin Up! Stamp Sets: Lovely As a Tree, Winter Post, Occasional Quotes Hostess Set

Paper: Stampin Up! Crumb Cake, Early Espresso, Very Vanilla, Whisper White, Deck The Halls DSP

Ink: Stampin Up! Classic ink pads in Crumb Cake, Soft Suede, Early Espresso, Cherry Cobbler

Accessories: Stampin Up! Versamarker, Iridescent ice, 1/8" black taffeta ribbon, 3/8" white taffeta ribbon, sponges, dimensionals, heat tool, blender pen, post it notes

Pin It

Saturday, December 11, 2010

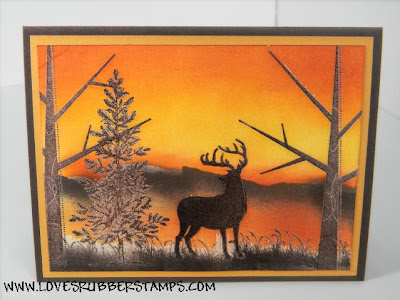
Sunset Deer

Good morning everyone! I can say for sure that the weather outside is frightful! We are having blizzard warnings for my state! Good day to stay in and stamp! I wanted to share with you a card I did for an inspiration challenge on splitcoaststampers. Each week they post a website for you to look through and pick an object that inspires you to create a card or project. For this challenge you were to go to the Bronner's Christmas Wonderland website and choose something to inspire you. Let me tell you - I had a very hard time picking just one! I will definately be doing some more because they have a ton of great products that will definately inspire you! Here is the ornament I choose for my inspiration:


And here is my card that I created:


I love how it turned out! This could be used for a lot of different occasions and is a perfect "man" card since they are so hard to make cards for at least I think anyway!

Take a look through the Bronner's website and see what you can find for inspiration! It is a lot of fun!

Here is what I used to create my card:

Stampin Up! Stamp Sets: Nature Silhouette, Season of Friendship, Lovely As a Tree

Paper: Stampin Up! Very Vanilla, More Mustard, Early Espresso

Ink: Stampin Up! Classic ink pads in Early Espresso, Daffodil Delight, More Mustard, Pumpkin Pie, Cajun Craze

Accessories: Stampin Up! Versamark, Clear embossing powder, heat gun, sponges, post it notes for masking.

Pin It

Wednesday, December 8, 2010

Festive Snowmen

Good morning everyone! Hope everyone is staying warm! It is FREEZING here....only a balmy 7 degrees this early morning! I had to break out one of my favorite snowmen stamps because well , it's cold - LOL! Here is my card for today:


I was trying to do a card with a more traditional color scheme. I think it turned out pretty cute! The background is made by inking my square lattice embossing folder with real red ink before running it through the big shot. I like how it turned out, kind of a Christmasy plaid look!

Here is what I used:

Stampin Up! Stamp Sets: Holiday Lineup, Loads of Love (sentiment)

Paper: Stampin Up! Real Red, Basic Black, Whisper White, Pear Pizazz

Ink: Stampin Up! Classic ink pads in Real Red

Accessories: Stampin Up! Square Lattice embossing folder, big shot, Stampin Up Markers, stamp-a-ma-jig

Pin It

Friday, December 3, 2010

Good Cheer Vintage Santa

I am really loving the vintage look for Christmas cards this year. I designed this card for my Christmas card stamp-a-sack. I love how it turned out! This is a quick and simple card that looks like a lot of work. The colors I choose are from a color challenge that is done each week on splitcoaststampers. This is their color challenge 298 featuring cherry cobbler, chocolate chip, crumb cake. Sounds like a fancy dessert, doesn't it? LOL!

Here is the color scheme color swatch from the splitcoast site:


Here is my card:


The layout I used is called a tent topper card. This was also a sketch callenge put on by splitcoast quite awhile ago. It was challenge 134. Here is the card sketch:


Be sure to visit the splitcoaststampers website and do a search in there gallery on these two challenges and see lots of other examples! You would type in CC298 for the color challenge and SC134 for the sketch.

Now I need to try and design some more traditional color schemed cards for my stamp-a-sack and go get some dessert....LOL!

Here is what I used to make my card:

Stampin Up! Stamp Sets: Good Cheer, Winter Post

Paper: Stampin Up! Cherry Cobbler, Chocolate Chip, Crumb Cake, Very Vanilla

Ink: Stampin Up! Classic ink pads in Chocolate Chip, Cherry Cobbler, Early Espresso

Accessories: Stampin Up! Pretty Petals embossing folder, blender pen, dimensionals, designer label punch, sponges

Pin It

Thursday, December 2, 2010

Reindeer Peeker made with Owl Punch!!

I am sooooo excited to share this card! I haven't seen this anywhere yet so who knows, I maybe the first - LOL! I was trying to think of a card to do and my owl punch sitting on my desk caught my eye. I started looking at the pieces and the owl body reminded me of a reindeer head and then the stomach part reminded me of hooves and WAAAAHHHLAAAAH.... my reindeer peeker was born! Rudolph's nose, the white and black part of the eye, are all from the owl punch too. The pinks of the ears, the antlers and the marina mist eyes are all pieces from the Sizzix die Swirls Scribbles. Check Rudolph out!


Isn't he the cutest??

The layout for this card was inspired by this one I saw on splitcoast by Bee-Bee.

I used the color coach to choose my colors. This color scheme was suggested on the basic black card: Cherry Cobbler, Baja Breeze & Basic Black.


I stamped the small swirl from priceless in versamark & heat embossed with iridescent ice on the baja breeze layer. Here is a closer peek at Rudolph for you!


I LOVE how he turned out - too cute!

Here is what I used:

Stampin Up! Stamp Sets: Big On Christmas, Priceless

Paper: Stampin Up! Cherry Cobbler, Baja Breeze, Soft Suede, Basic Black, Real Red, Whisper White, Pink Pirouette, Marina Mist

Ink: Stampin Up! Classic ink pads in Chocolate Chip, Cherry Cobbler

Accessories: Stampin Up! Versamark, Iridescent Ice, Heat tool, 1/8" black taffeta ribbon, dimensionals, blender pen, Stampin Up pastel chalk, Stampin Wrute markers in Old Olive, More Mustard, Basic Black, dimensionals, Owl Punch, Swirls Scribbles Sizzix Die, Big Shot, Color Coach, White Gel pen, Crystal effects

Pin It

Handmade Holiday Promotion


Happy December everyone! Hard to believe that it is almost the end of the year and that Christmas will be here before you know it! I wanted to take a minute to tell you about a few things.

From now until DECEMBER 16th you can still take advantage of the Handmade Holidays promotion. There are a few select Stamp sets bundled with designer series papers and punches all at 20% off! Click Here to see the product bundles in the Handmade Holiday promotion!


Also being December this is the LAST MONTH to order out of the HOLIDAY MINI CATALOG! Get all your favorites as soon as you can because once the items are gone - they are gone! The Candy Cane Christmas designer series paper is already no longer available. So don't let your favorites sell out before you get them!


Click here to view the HOLIDAY MINI CATALOG

The last day to order to ensure Christmas delivery is DECEMBER 15, 2010 by Noon - Click here to order now.

Have a great night all!

Friday, November 26, 2010

BLACK FRIDAY DEAL!

Hope everyone had a fantastic Thanksgiving! If you are like me and don't like fighting the crowds at the stores on this Black Friday...shop online with me from home! Stampin Up! is offering an INCREDIBLE deal that will last from now until November 30th! With FREE SHIPPING on orders over $150, products like MY DIGITAL STUDIO at HALF PRICE, you can't go wrong shopping from home in your jammies!

CLICK HERE TO GET A DETAILED LIST OF WHAT IS ON SALE!

CLICK HERE TO GO TO MY ONLINE STORE - SHOP NOW!


Thanks for shopping with me!

Thursday, November 25, 2010

Lovely As a Tree - Vintage Christmas

One of my favorite stamp sets is Lovely As a Tree. You can use it for pretty much any occasion. I was working on designing my cards for my Christmas stamp-a-sack and here is one of the cards I came up with.


It is hard to see in the picture but the tree is completely embossed with iridescent ice embossing powder so it is all sparkly! I love how it turned out!

I wanted to bling mine out just a bit more so I made another card sample and added some snowtex under the tree to really make it pop!


Here is what I used to create these cards:

Stampin Up! Stamp Sets: Lovely As a Tree, sentiment is from A Cardinal Christmas, snowflake from Snow Swirled

Paper: Stampin Up! Sahara Sand, Whisper White

Ink: Stampin Up! Classic ink pads in crumb cake - sponging & the tree, soft suede for sentiment, snowflakes done in whisper white craft ink

Accessories: versamark, iridescent ice embossing powder, heat gun, sponges, whisper white taffeta ribbon

Pin It

Saturday, November 20, 2010

Inspired By Nature

I AM BAAAAACK! YAY! I finally got down to clean off my desk and get my stamp area half way usable since the flood! So since my desk was clean I had to stamp something - lol! I haven't been able to stamp in forever it seems!

Since I hadn't stamped for awhile I thought it would be fun to pull out my Stampin Up! Color Coach and try a color combination challenge! The one I chose from the back of the Cherry Cobbler card for the creative combination. It uses Cherry Cobbler, Early Espresso, & Daffodil Delight! I love love love these colors! Here are the colors from my color coach.


I also thought it would be fun to do the Mojo Monday Sketch Challenge so I used the layout to make my card also! I flipped the sketch sideways because the stamp I chose fit better that way. Here is the Mojo Sketch #165:


And here is my finished card!


I love how it turned out! This is the first time I have used the flower stamp from Inspired by Nature. I have used the grass one a lot but hadn't tried the flowers. Hope you like it!

Stampin Up! Stamp Sets: Inspired By Nature, Fresh Cuts

Paper: Stampin Up! Early Espresso, Cherry Cobbler, Daffodil Delight, Sahara Sand, Chocolate Chip

Ink: Stampin Up! Classic ink pads in Chocolate Chip for sponging, Early Espresso

Accessories: Stampin Up! Versamark, Scallop Edge Punch, Crimper, both oval large punches, paper piercer, black grosgrain ribbon, corner rouder punch, dimensionals, prismacolor watercolor pencils - white, black, dark umber, square lattice embossing folder, clear embossing powder, embossing gun

Pin It

Wednesday, September 29, 2010

Tote-ally Awesome Deal!

I thought it would be a perfect time to update you all on the current Stampin Up! special they have going on to get this TOTE-ALLY Awesome Craft Tote for the bargain price of FREE! That is right for FREE!


Isn't it pretty? It is patterened after the Greenhouse Gala Designer Series Paper! Imagine sharing your love of Stampin' Up! with this stylish tote that is large enough to carry 12" x 12" card stock and a paper cutter, as well as punches, ink pads, and accessories. The best part is there are TWO Starter kits to choose from, Standard and Digital at a new lower price, there's never been a better time to join the Stampin' Up! family.

Take a look at this video showing more about the GREENHOUSE GALA TOTE

Ready to get started? CLICK HERE and use my password LOVESRUBBERSTAMPS

Get your's today! This offer only lasts until October 18th!

Back Finally!

Hi Everyone -

I am finally back! I am hoping to get back to making some stamping projects and putting together a technique class here in the next week or so. Our basement flooded and that is where all my stamping stuff is. Once I get some kind of order back and can find everything I will be back to posting on here. Right now all my stamping stuff is buried in sacks and boxes. I appreciate all that have joined as my followers and will be getting caught up on that as well. Thanks for your patience everyone! I did get the new link for the holiday mini catalog up! They have a lot of really cute things so be sure and take a look! Take care - Laura

Thursday, July 1, 2010

New Catalog!

Hello everyone!

Sorry for the lack of posts, I have been really busy filling in at work with everyone going on vacation. But overtime means more money for STAMPS - LOL! Speaking of stamps.... there are a whole bunch of new stamp sets in the BRAND NEW 2010 - 2011 catalog which went live today! You can see the whole thing online by clicking on the catalog on the left sidebar, or better yet get a FREE HARDCOPY when you host a workshop with me. They are also available for purchase for $9.95 plus postage just contact me to make arrangements to get your's. This new catalog is AWESOME! The hostess sets are amazing and the new accessories will be so much fun to play with. I really love the new book, but don't just take my word for it...check it out!

For today's card I wanted to use some new goodies from the catalog. The stamp set is a level 1 hostess set called Because I Care and is one you can choose for FREE when your workshop or personal order qualifies. The main colors I chose for my cardstock and background were chosen using a new fun tool available for purchase called the color coach. It has large samples of all the cardstock colors and color combination suggestions on the back. The one I went with for my card are all new ones called, MARINA MIST, CAJUN CRAZE & CRUMB CAKE (love this color!) The color coach replaces the color wheel and is so much better! The color samples are a huge 2 3/4" x 4 1/2" Here is what the color coach looks like:


To order your own color coach click here.

Here is today's card


I LOVE this new hostess set! The hydrangea flower is so detailed and pretty! I stamped the main flower bloom in versamark and colored it using pastels. I used a layout design from splitcoast stampers - card sketch 284. Here is a cool tip for the card sketch layout... Click on the picture itself and it will enlarge to the exact size of a standard card so you can get the measurements for each panel using your ruler!


To make this card:

Stamp Sets: Because I Care hostess set, Pocket Silhouettes

Paper: Stampin Up! Crumb Cake, Cajun Craze, Whisper White

Ink: Stampin Up! Classic ink pads in Marina Mist, Whisper White, Old Olive, Elegant Eggplant, Chocolate Chip (sponged the edges of crumb cake)Versamark

Accessories: Stampin Up! Stampin Up! Pastels, dimesionals

Pin It

Wednesday, June 9, 2010

Spotlighting - Elements of Style

Evening everyone!

My NEW Stampin Up! catalog came today!! YAY! I haven't opened my box yet because I am waiting until after I get this post done and supper made because I will be looking at it for hours - LOL! For my June technique class we will be doing a technique called spotlighting so I started to play with the technique. Spotlighting is where you have a black and white image or any other color you want and only color a small section. Here is a card that I made using the Elements of Style stamp set and the new cherry cobbler paper - yum! I love the new colors!


My spotlight on this card is done using the butterfly punch and then popped up on pop dots to match the section of the image that I colored. The embossing folder is sqaure lattice from the summer mini. I was inspired by a card done by Karen B Barber on splitcoast.

Here is what I used to make mine:

Stamp Sets: Elements of Style

Paper: Stampin Up! whisper white, cherry cobbler, basic black

Ink: Stampin Up! Classic ink pads in basic black, ruby red, old olive, chocolate chip

Accessories: Stampin Up! square lattice embossing folder, butterfly punch, dimensionals, slot punch, scallop oval punch, large oval punch, 1/4" basic black grosgrain ribbon

This will be one of the cards we will make at my June Technique class! It will be a fun class also featuring reverse spotlighting, faux wood, & punch art dog cards! See my event calendar for full details here! Come join us!

Pin It

Tuesday, June 8, 2010

Frame Illusion - Elements of Style

I love this new stamp set that is featured in the SUMMER MINI CATALOG called Elements of Style. I finally had a chance to play with it. I follow a blog done by a very talented lady named Michelle Zindorf. She does some amazing cards and creates a step-by-step tutorial to show you how to do them. One of my favorite cards she did was one that had a frame illusion. It looks like a painting in an ornate wood frame and appears to pop right off the page. When I saw this stamp set in the mini I knew I had to use it to make a card like that! Here is my card....


I love how it turned out! I decided to use a technique called poppin pastels to color my hummingbird. I stamped it in versamark and then rubbed pastel chalk over the versamark. It really grabs the colors of the chalk. I then cut it out and popped it on dimesnionals. The rest of the card is completely flat! How cool is that?

To see how this card is done and to see my inspiration check out Michelle Zindorf's tutorial - click here

My card uses all stamps from the Elements of Style stamp set. With my card I wanted my flourishes to stay on just the "frame" part and not carry over to the canvas so when I inked those in versamark I had a post it note covering my "canvas".

Here are the colors I used on my card:

Flowers - done in crushed curry with blender pen, mellow moss & old olive (marker) on the leaves
Canvas - Sahara Sand - sponging around the edges in chocolate chip to soften it
FRAME - versamark flourishes then embossed with clear embossing powder, sponged close to cocoa first then chocolate chip on outside to darken, my shadow edge for the canvas is chocolate chip
HUMMINGBIRD - stamped in versamark then used Stampin pastels in summer sun, lovely lilac, ruby red, garden green

Here is a list of supplies used:

Stamp Sets: Elements of Style

Paper: Stampin Up! Basic black, Cajun Craze (new upcoming color!), Whisper white

Ink: Stampin Up! Classic ink pads in Sahara Sand, close to cocoa, chocolate chip, crushed curry, mellow moss, versamark

Accessories: Stampin Up! Stampin pastels, blender pen, dimensionals, clear emobossing powder, heat gun, sponges, chocolate chip stampin write marker

Hope you try one out!! Night all!

Pin It

Monday, June 7, 2010

WANTED - Punch Art Card

Good Evening all!

I was going to post this card for you this morning but blogger seemed to be down for awhile. This is the 4th card we made in my faux metal technique class. I wanted to demonstrate the GUN METAL technique because I love the look of it and when I saw this card done by carriejoe I knew I had to make one myself and use gun metal for his hat star.

Here is a close up of what the gun metal technique looks like:


HOW TO DO THE GUN METAL TECHNIQUE:
Materials - Chipboard, Encore ink pad, Glassy glaze enamel, heat gun
STEP 1 - Choose your chipboard shape
Step 2 - Cover the front of your chipboard piece with silver or gold encore ink, using the encore ink pad. I used the silver on mine. Easiest way to do this is to lay your chipboard down on scratch paper and then rub or press your encore pad onto it. Do this until your piece is completely covered in ink.
STEP 3 - Cover your chipboard with glassy glaze enamel
STEP 4 - Heat the glassy glaze until it bubbles, then let it cool & Wahlah - gun metal!
Optional Step - After your piece is cooled you can rub some black ink over the gun metal with a sponge to age it a bit - I did not do this on either of my pieces. If you don't have glassy glaze you can substitue UTEE (ultra thick embossing enamel) they are similiar in consistency, the glassy glaze is a little finer but really close.

Here is my finished card:


Isn't he the cutest? Here is what I used to make the little wanted dude. The hat was made using the Stampin Up! Top note die. I cut one in close to cocoa cardstock and then cut it in half to use for the hat. The hat brim is made using 2 long leaves from the Sizzix Leaves #2 die. I just cut a small strip of chocolate chip for the hat stripe. All hat pieces are sponged with chocolate chip ink for dimension. His face was an oval cut out in blush blossom using the coluzzle. His mask is also 2 leaves without the stems from the Sizzix Leaves #2 die in basic black. Then I punched 2 white circles with the 3/4" circle punch, his nose and the blacks of his eyes are punched with the 1/2" circle punch. His nose is popped on dimensionals to peek over the wanted sign. I used a white gel pen to make the highlight on his pupils.

This is a really fun card to make and he is sooo cute! Hope you try one!

Stamp Sets: Wanted

Paper: Stampin Up! Creamy Caramel, Close to Cocoa, Chocolate Chip, Basic Black, Bluch Blossom, Whisper White, Very Vanilla

Ink: Stampin Up! Classic ink pads in Chocolate Chip, Creamy caramel, encore silver ink pad

Accessories: Stampin Up! Chipboard stsr from the On Board Essentials set, Sizzix top note die, Sizziix Leaves #2 die, coluzzle, 3/4" & 1/2" circle punches, dimensionals, distress edger, vintage brads, glassy glaze enamel, heat gun

Have a great night all!

Pin It

Sunday, June 6, 2010

Pretty Tulips - Faux Metal Tin Ceiling

Afternoon stampers!

I wanted to share the 3rd card that we did at my faux metal technique class featuring Faux Metal Tin Ceiling. This is such an elegant background I absolutely LOVE it!

Here is the card:


Turned out really pretty I think! I drew my inspiration from a lady by the name of Diana Gibbs. She did a gorgeous card using this same technique and color scheme and even put together an awesome tutorial video on how to do this technique. If you want to see the tutorial that she put together click here:

FAUX METAL TIN CEILING

To make the background I used the Textured Impressions FINIAL PRESS embossing folder.

My vase and tulips were made using Stampin Up! punches. To create the vase take the ornament punch and punch out an ornament. Snip off the pointed end so it is flat. I embossed mine with the same embossing folder as the background for added texture. The tulips were made using the Stampin Up! Two-Step bird punch. You punch 3 of his wings in whatever color you want your tulips to be. Mine were done in crushed curry. You can sponge the edges of your flowers if you want also. Be sure to layer them so your two wing tips for the outside petals are both facing the outside, the middle one doesn't matter. glue them together. Then punch a stem of leaves from the same bird punch for your flower stems. I popped my tulip heads on dimensionals.

Here is the full list of products used:

Stamp Sets: None! All punches!

Paper: Stampin Up! Bashful Blue, Basic Black, Whisper White, Crushed Curry, Old Olive, Sahara Sand was used for my tin ceiling base

Ink: Stampin Up! Silver Embossing powder & Versamark

Accessories: Stampin Up! Textured Impressions Embossing Folder - FINIAL PRESS, Two-Step Bird Punch, Ornament punch, dimensionals, 2-way glue pen

I love how this card turned out! This is a beautiful technique and I hope you try one and put a link to your card in your comment.

Pin It

Friday, June 4, 2010

Own your own Stampin Up! Business for $99

YES! You read the title right! The whole month of June Stampin Up! is offering you the opportunity to become a demonstrator for only $99! If you have ever thought of joining or maybe rejoining Stampin Up! now is your chance. Want more information on being a demonstrator? Contact me and we can set up a time to get together and I will answer any questions you may have or you can go to my website, click on "Start your own business" and use the password LOVESRUBBERSTAMPS Click here to go to my website.


Here is what will come in your kit:

Mini Starter Kit
All items below are recommended, but a new recruit can substitute a like item of equal or lesser value.

Item Description Price
117050 Watercolor Trio stamp set (wood-mount) $22.95
118571 I {Heart} Hearts stamp set (clear-mount $18.95
118486 Clear-Mount Block C $6.95
116978 Homemade single stamp* $8.95
100730 Whisper White card stock (8-1/2" x 11") $8.50
119706 Brights Collection assorted card stock (8-1/2" x 11")* $6.95
115656 Melon Mambo Classic Stampin' Pad $5.95
119667 Daffodil Delight Classic Stampin' Pad* $5.95
115658 Rich Razzleberry Classic Stampin' Pad $5.95
100814 Tempting Turquoise Classic Stampin' Pad $5.95
119261 Basic Black 1/8" taffeta ribbon* $6.95
121620 Color Coach* $14.95
104332 SNAIL Adhesive $6.95
Retail value of products in kit $124.90

Items with * next to them are BRAND NEW products for the 2010-2011 catalog that were available in our "sneak peek of new products"

If you want to see which products you can substitute download this flyer. All items with the gray shaded box are ones that you can not substitute - any questions about the form just give me a call, send an email or we can fill it out together :-) after you are finished choosing your starter kit, Go to my website with the link above and use the password LOVESRUBBERSTAMPS

You will also receive in your kit the same business supplies that are in the standard Starter Kit; no alternative selections can be made for business items. Contents are listed below:

* Getting Started DVD
* Getting Started Guide
* Guest Invitation Postcards (100)
* 2009 - 2010 Idea Book & Catalog (8) **See Note at Bottom
* Summer Mini Catalog (8)
* To My Hostess Envelopes (10)
* Recruit Folders (5)
* Recruit Brochures (20)
* Hostess Brochure (20)
* Hostess Benefits Form (10)
* Customer Order Form (50)

** New demonstrators who join Stampin Up! in June, you will receive a free box of 2010-2011 Idea Book and Catalogs during the first part of July.

Here is a flyer about this promotion also - click here

Things to Remember:
All Mini Starter Kit order forms must arrive at Stampin' Up! (in office) by Wednesday, June 30, 2010, to qualify for the promotion and for any 2009-2010 Stampin' Up! year promotions, incentives, or awards.

I look forward to having you on my team! Have a great night - Laura

Tuesday, June 1, 2010

RETIREMENT LISTS


Good Morning Stampers!

The retirement lists have posted! Here are the lists of the retiring products.

LAST CHANCE STAMP SETS

LAST CHANCE DEFINATELY DECORATIVE

LAST CHANCE ACCESSORIES

The accessories list shows that all of the punches are retiring - this is not technically the case... the punches are being redisgned to be the same style as the punches that are in the mini catalogs. The slim design, so the old style punches are retiring to be replaced with the slim line. All of the items with the asterick * behind it mean that there will be newer or repackaged items in the new catalog.

Be sure and order your items as soon as possible to be they are available. They have already sold out of some of the retiring cardstock colors! Here is a link to my Stampin Up! website so you can place your order or to see pictures of the retiring items under the products tab shop now. Click Here

Monday, May 31, 2010

Faux Metal Tools - Father's Day

Good evening stampers! At midnight tonight the retiring list posts! This is one night I am glad I actually have to work since I wouldn't be able to sleep anyway - LOL! Be sure to check back tomorrow and I will have it posted for you so you can get the items on your wish list before they are gone!

In the meantime... I wanted to show you another card that we made at my May technique class featuring Faux Metal. This was a card we made for Father's Day. I cased this card from hmlopez on splitcoaststampers. I had to make my own overall pattern using her's as a guide. I also changed the colors and did my stitching and "denim" different. Turned out really cute!


Isn't that adorable? The faux metal technique was used to make the little tools in the pocket. I popped the heads of the tools up on dimensionals after cutting them out and also popped the top part of the pocket to make it look more 3D. The "denim" look was achieved by lightly sponging white craft ink over the night of navy cardstock. I love how it turned out! Here is what was used:

Stamp Sets: Totally Tool, King of the Grill (inside sentiment is Happy Father's Day)

Paper: Stampin Up! Night Of Navy, Blush Blossom, Hostess Level 1 Patterns Pack DSP, Sahara sand was used as the base for the faux metal technique

Ink: Stampin Up! Classic ink pads in White Craft Ink, Chocolate Chip (inside sentiment)

Accessories: Stampin Up! dimensionals, versamark, silver embossing powder, heat gun, jumbo eyelets pewter, black marker, cutter distress tool, crop-a-dile

Hope you enjoyed the card! Check back later this week and I will show you a card we made using a Gun Metal Technique & Faux Metal Tin Ceiling. Happy Stamping all!

Pin It

Wednesday, May 26, 2010

Faux Metal - Le Jardin Botanique

Hello Stampers!

Last night I demonstrated Faux Metal and some variations for May's technique class and here is one of the 4 cards we made. This uses the Faux Metal technique using silver embossing powder.


This card can be used for many different occasions. I love the faux metal technique, it really makes pretty cards and gives them an extra special punch. I got the idea for this card from a card made by ravengirl on splitcoaststampers. I used her layout but changed the colors and stamp sets used.

I will be posting the other cards we made at last night's class later this week. Be sure to check back and see some variations on the faux metal technique!

Stamp Sets: Stampin Up! Le Jardin Botanique, Friends 24-7

Paper: Stampin Up! Very Vanilla, Chocolate Chip & Sage Shadow

Ink: Stampin Up! Classic ink pads in Chocolate Chip, Versamark

Accessories: Stampin Up! Scallop border punch, 1 1/4" square punch, paper piercer & mat, dimensionals, silver embossing powder, heat gun, chocolate chip 5/8" grosgrain ribbon

Pin It

Thursday, May 13, 2010

Carry over products from mini catalogs

Hi Everyone!

I thought I would post a list of all the items that were featured in the Holiday Mini & The Occasions mini that were not discontinued and are still available for purchase. These will all hopefully be in the new idea book catalog July 1st. Until then you can order any of these products from me here.


You can click on the pictures to make them bigger and print them if you would like. I also have a link on the side bar to the flyer as well!

Have a great night!

Wednesday, May 12, 2010

Sense of Time - Mojo Time!

Hello everyone!

I had such a good time playing with the Mojo sketch from last week that I thought I would play again this week! They have the coolest sketches that really challenge your creativity. This week I wanted to use a stamp set that I love but have not used in quite awhile. I also wanted to start playing with the Faux Metal technique that I will be demonstrating at my next Technique class on May 25th. So I combined all of these elements and came up with this card:


I love the saying in this stamp set, it is one of my favorites: "Learn from yesterday, Live for today, Hope for tomorrow"

I made my own background using the Close As a Memory flowers. Stamped them in versamark on creamy caramel cardstock (retiring - so sad about this one!) then heat embossed with white embossing powder and sponged the edges in chocolate chip ink.

For the black panel I used a technique called Rainbow embossing which is a technique featured on one of the two FREE WOW Technique videos that you will get for free when you sign up to be a demonstrator. Click here for information you will need my password lovesrubberstamps to join! Here is a view that helps you see the shimmer on the black panel and the way the colors change using the rainbow embossing technique. Isn't that pretty? I then mounted that piece on vellum cardstock.


To do the top panel I stamped the saying in chocolate chip ink on the creamy caramel cardstock and then clear embossed it. I then used versamark ink and stamped the clock face over the saying. I clear embossed that and then sponged over the top of the panel using chocolate chip ink. This is called emboss resist technique. I love how it turned out! My cog wheels are done using the faux metal technique with gold embossing powder. Here is a view so you can get a better look at the cog wheels.


Here is the MOJO MONDAY sketch from week 138 that I used as inspiration for my card:


Here are the supplies used to create this card which you can order here:

Stamp Sets: Close as a Memory, Sense of Time

Paper: Stampin Up! Creamy Caramel, Basic Black, Vellum Cardstock

Ink: Stampin Up! Classic ink pads in Chocolate Chip

Accessories: Stampin Up! White, Gold & Clear embossing powders, Iridescent Ice, heat gun, dimensionals, versamark ink, & 5/8" chocolate chip grosgrain ribbon. Masterpiece ribbon set

Hope you enjoy the card! Have a great night all!

Pin It